
Receive Github webhooks on Jenkins without public IP
A short tutorial on how to configure and receive Github webhooks on your jenkins instance even without a public IP
How to Set Up Jenkins GitHub Webhooks
To set up Jenkins GitHub webhooks, you need to install the GitHub plugin in Jenkins, configure a webhook URL in your GitHub repository settings, and set your Jenkins job to trigger on GitHub hook events. If Jenkins is behind a firewall, you can use Webhook Relay to receive webhooks without exposing your server to the public internet.
Jenkins is probably the most popular CI tool. Since Dev and Ops roles are growing more and more alike we need to reduce initially required 'activation energy' to adopt automation tools. Building and testing software should be easy, fast and reliable. Current technique known as polling repository usually results in constant delays where engineers have to wait till the next CI scanning cycle.
Another option is to use webhooks but that requires you to expose your CI server to the public internet (you can still whitelist IPs though).
In this article we are going to show how to configure end-to-end CI pipeline where you can instantly trigger jobs via Webhook Relay service without internal Jenkins being exposed to public internet.
If you are running Jenkins on Kubernetes, check my other blog post here. It demonstrates how to configure a Jenkins instance with Webhook Relay agent running as a sidecar.
For production-ready Webhook Relay & Jenkins setup please visit our Jenkins tutorial. This tutorial will show how to configure agent in a way that it survives restarts either with Docker container or with operating system background service.
Desired workflow
Let's say we need to connect GitHub with internally deployed Jenkins which is not reachable from outside. In order to do this, we will be using Webhook Relay:
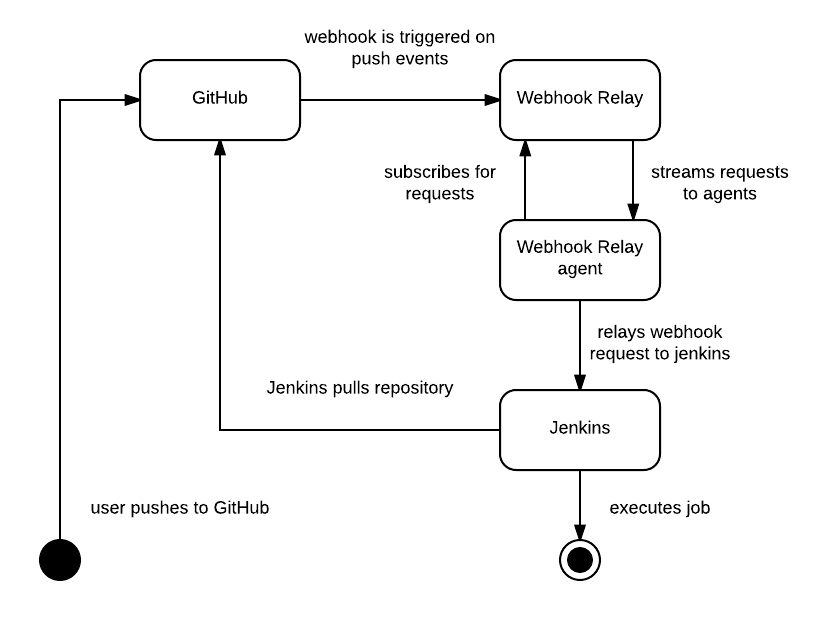
Once webhook is relayed by the agent, Jenkins pulls the newest code and executes the configured job.
Step 1: Create GitHub repository
First things first, we need to get a repository! If you haven't got GitHub account, get one. You will need it later to login to Webhook Relay too. Once you have logged into GitHub, look for a green "New Repository" button on the bottom right corner and click it.
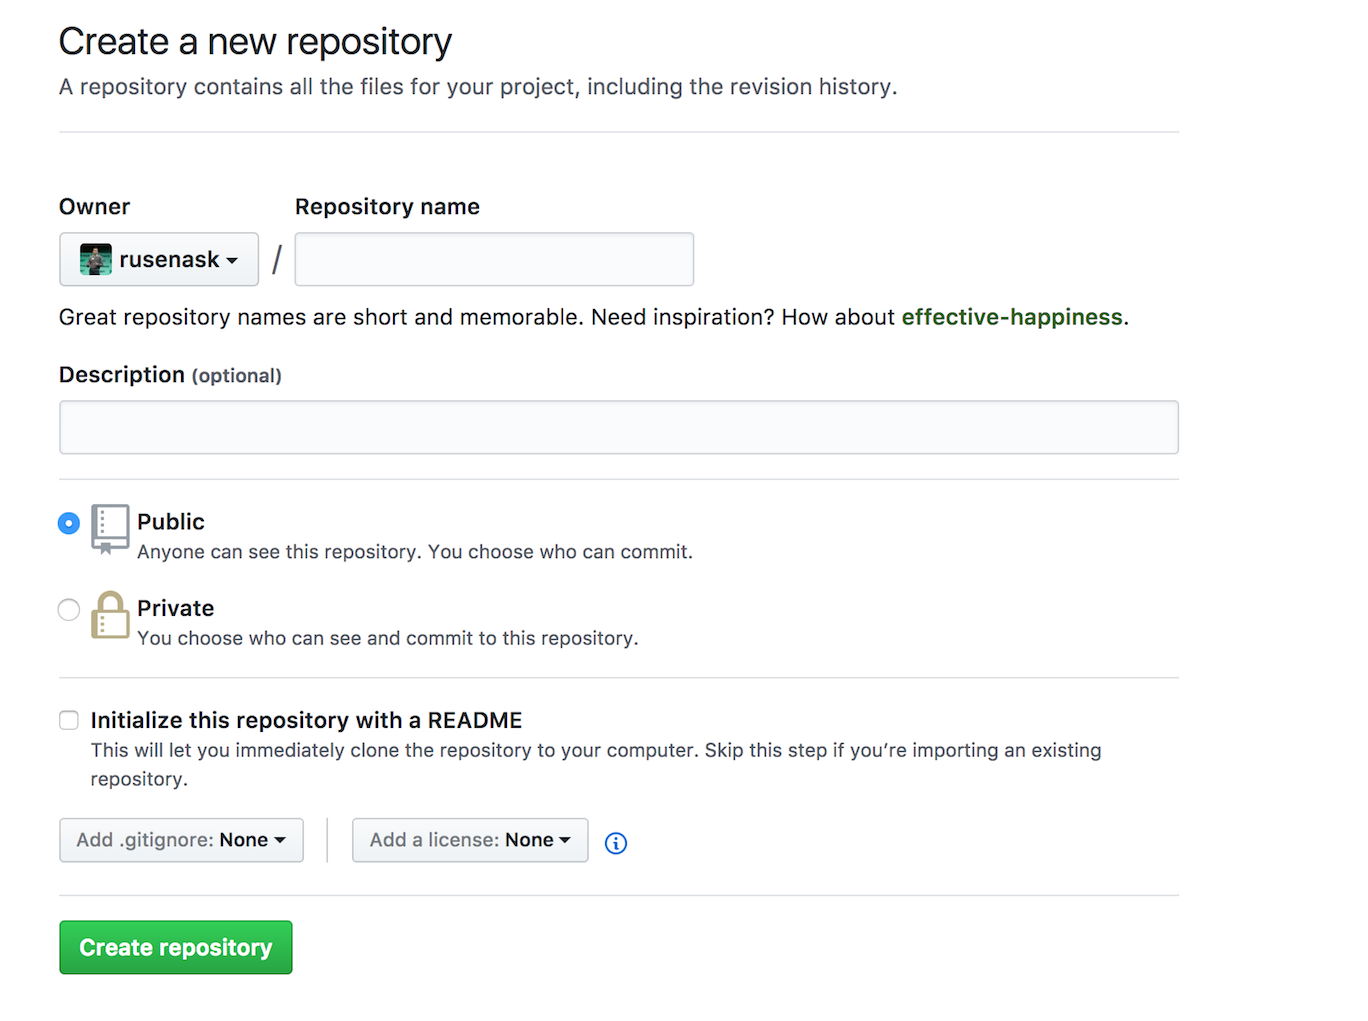
Choose public option as it will make this tutorial slightly quicker. Don't close this repo window as we will be back there shortly.
Step 2: Jenkins Installation (if you already have it - ignore this step)
It's time to get that Jenkins up and running! Head to https://jenkins.io/download/ and download our beloved (it's not pretty but gets the job done) Jenkins. In this guide we use standard installation but I would recommend using dockerized images, especially since it's so easy to build a new image on top of the official one.
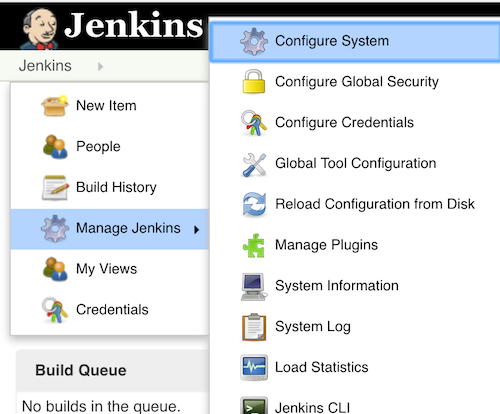
Step 3: Setting up Jenkins with Github-Plugin
The easiest way to start receiving GitHub webhooks is by using this plugin https://plugins.jenkins.io/github:
- Go to your Jenkins plugin manager
- Find and install "GitHub plugin" (at the time of writing - current version was 1.27.0)
- Once it's installed, we will need to configure it:
Add default GitHub server (don't bother adding credentials as we are using public repo anyway):

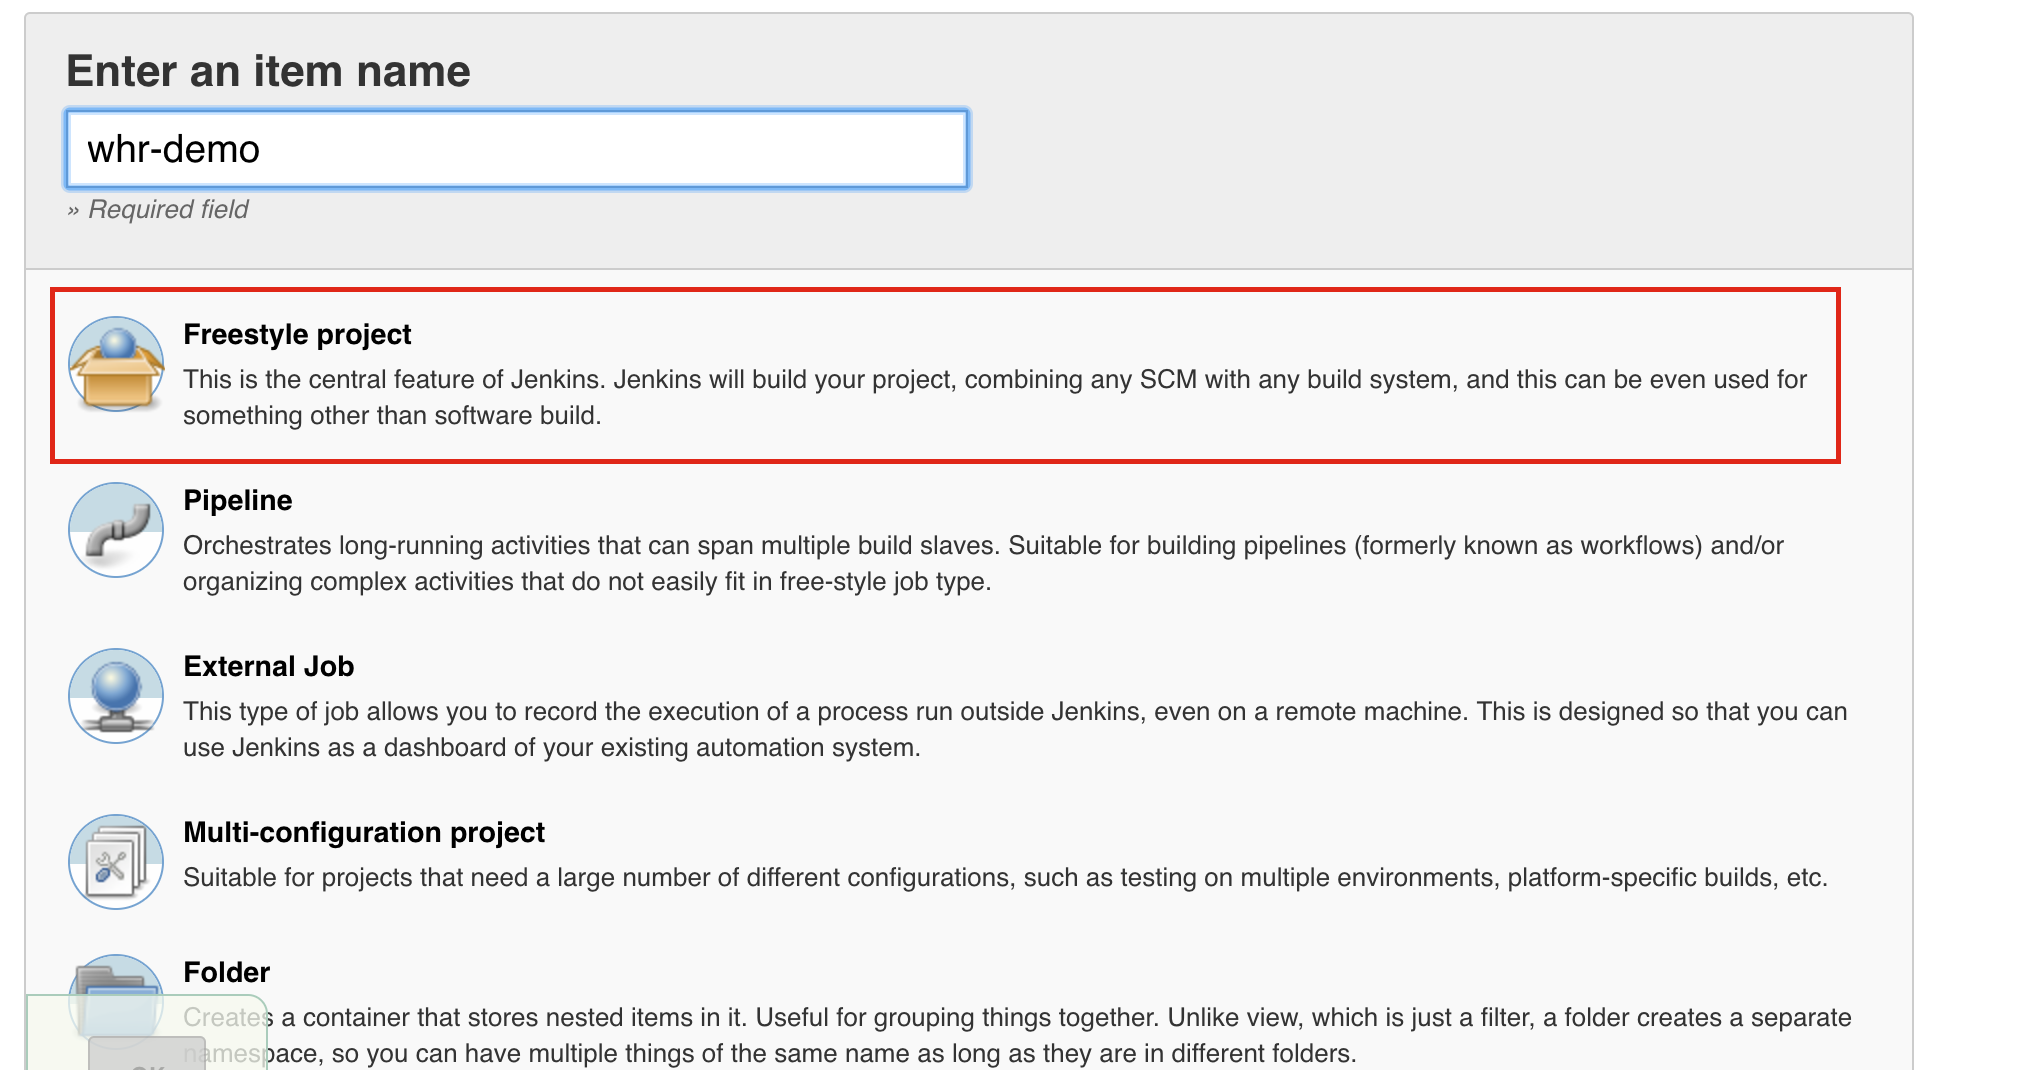
Step 4: Configuring Jenkins Job
When you want Jenkins to do something - create a job. In this case we will be using Freestyle project:
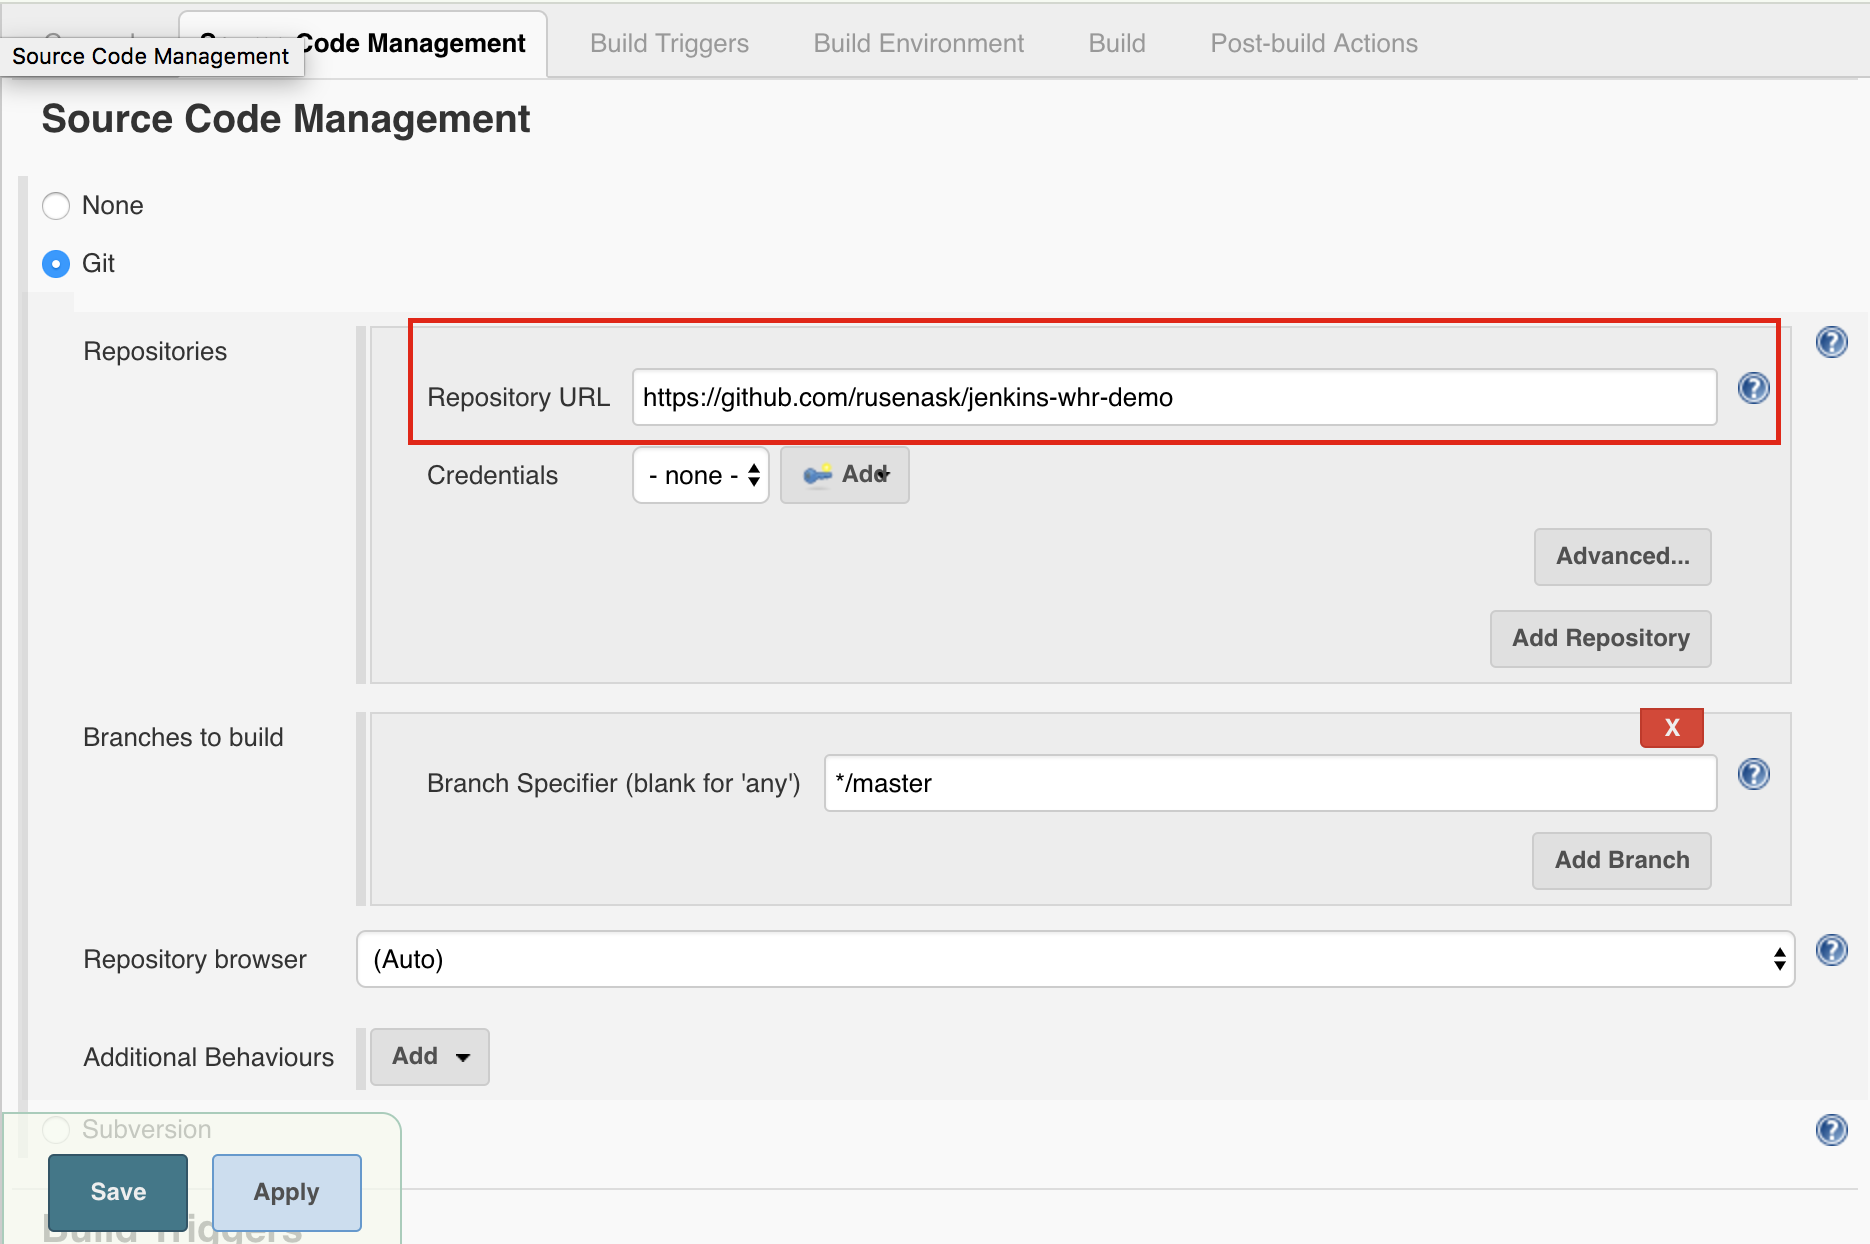
We have to configure several sections here - Source Code Management and Build Triggers. First, set repository (in this case it's my demo app repo repository):
Next step is setting a build trigger to GitHub hook trigger for GITScm polling:
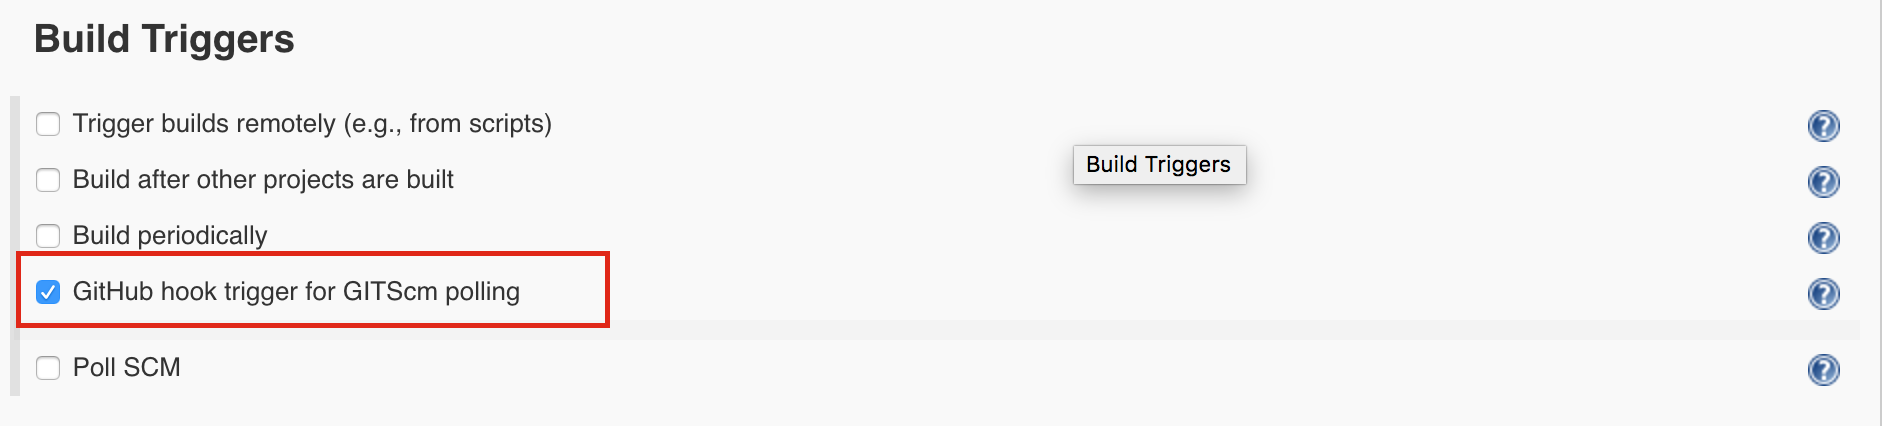
This means that once the Jenkins receives a webhook, it can identify which repo is changed and thus triggers a pull and job execution.
Step 5: Configuring Webhook Relay
First of all you will have to register and download the agent. See installation instructions if you don't have an account yet (you can use GitHub OAuth option since you would already have an account with it).
For authentication, agents use pairs of keys and secrets or regular account usernames/passwords. Head to the tokens page (left navigation menu) and create one key/secret pair. Be sure to copy those somewhere so you don't lose them in the next 2 minutes.
Step 6: Setting up Webhook Relay agent
To login with the CLI use token (generate it here) key/secret:
relay login -k your-token-key -s your-token-secret
You will then need to start forwarding webhooks to Jenkins:
relay forward --bucket github-jenkins http://localhost:8080/github-webhook/
Forwarding:
https://my.webhookrelay.com/v1/webhooks/6edf55c7-e774-46f8-a058-f4d9c527a6a7 -> http://localhost:8080/github-webhook/
Starting webhook relay agent...
1.511438424864371e+09   info    webhook relay ready...  {"host": "api.webhookrelay.com:8080"}
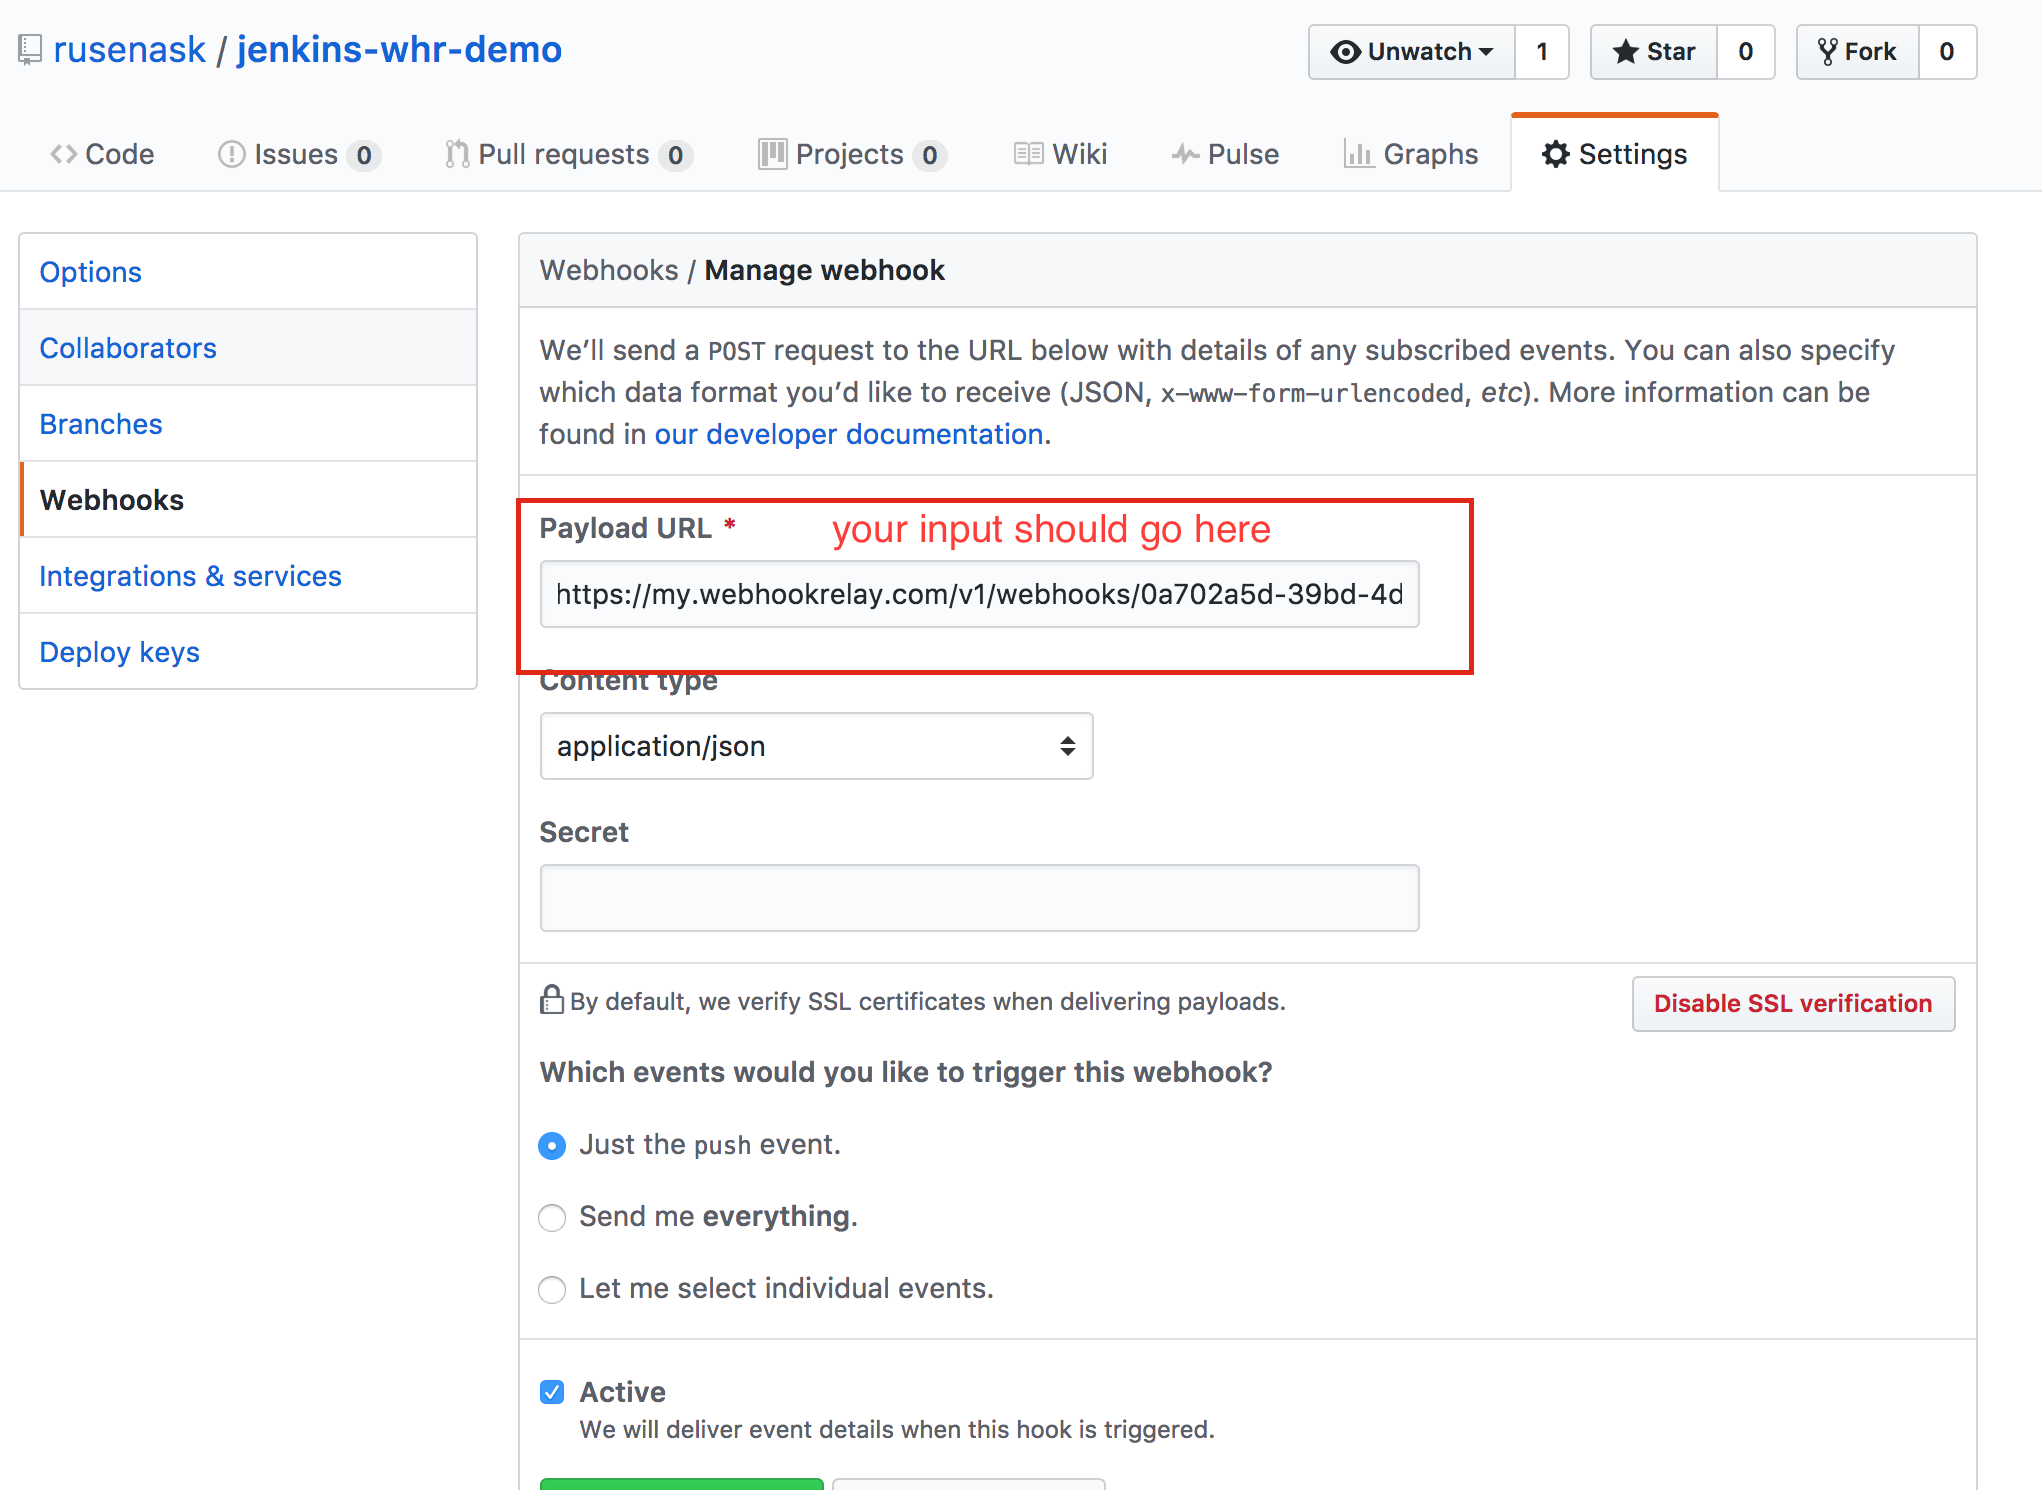
Once you have your Input URL (in this case it's https://my.webhookrelay.com/v1/webhooks/6edf55c7-e774-46f8-a058-f4d9c527a6a7) get back to GitHub's webhook configuration and set it:
That's it! The agent is running and forwarding requests.
Create sample application
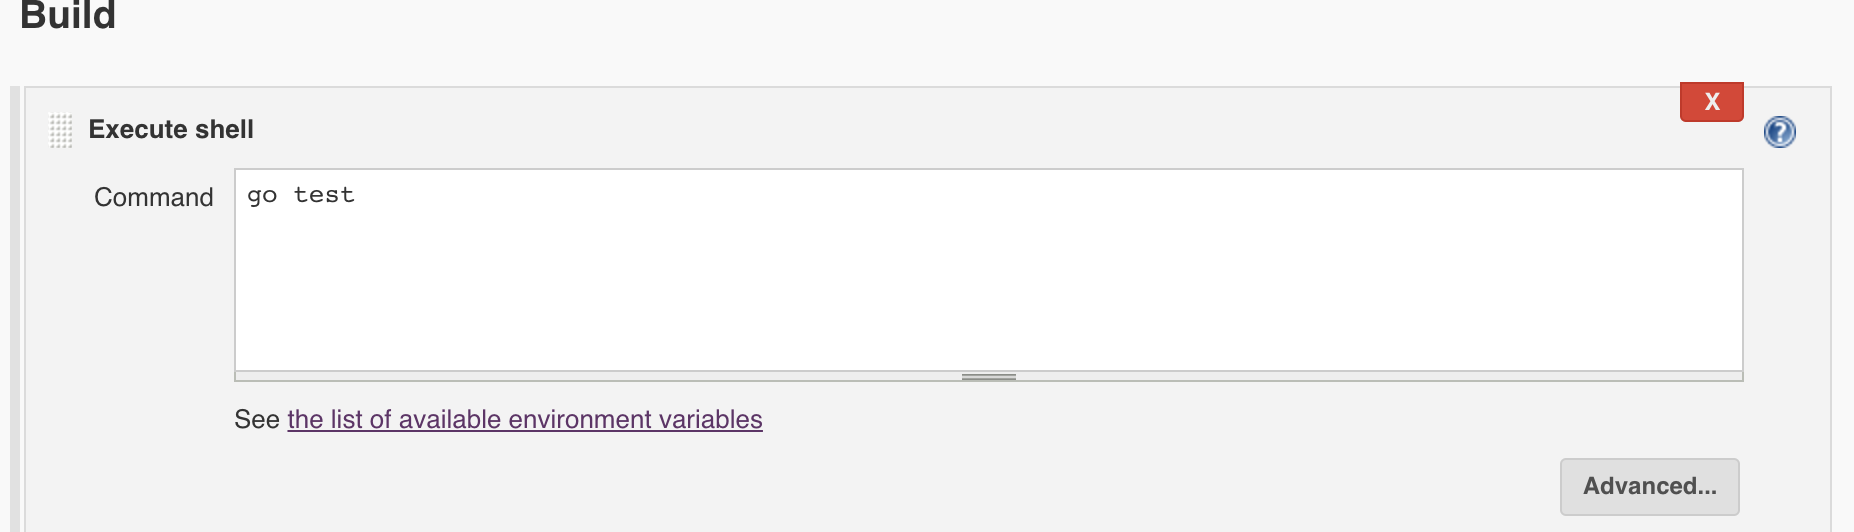
For the sake of demo I have created a sample application, source code here. It has some tests inside that our Jenkins job will be able to run. I use EnvInject Plugin to provide access to system's Go. The last thing left, is to add build step:
On the Webhook Relay logs page https://my.webhookrelay.com/logs you should be a able to see sent logs.
Test it!
Now, do some changes and push to master. In a few seconds you should see that Jenkins is checking repository. Cheers!
Step-by-Step Setup Guide (short version)
Here's a complete step-by-step guide to set up Jenkins GitHub webhooks:
- Install Jenkins GitHub Plugin - Go to Jenkins plugin manager and install the "GitHub plugin"
- Configure GitHub Server - In Jenkins settings, add the default GitHub server configuration
- Create Jenkins Job - Set up a Freestyle project with your repository URL in Source Code Management
- Enable Webhook Trigger - Select "GitHub hook trigger for GITScm polling" in Build Triggers
- Set Up Webhook Relay - Sign up for Webhook Relay and create an authentication token
- Start Forwarding - Run the relay agent to forward webhooks from Webhook Relay to your Jenkins instance
- Configure GitHub Webhook - Add the Webhook Relay URL to your GitHub repository webhook settings
- Test the Integration - Push a commit to your repository and verify Jenkins triggers the build
Troubleshooting FAQ
Webhook is received but Jenkins doesn't trigger the build
Check that your Jenkins job has the correct repository URL configured in the Source Code Management section. The repository URL must exactly match what GitHub sends in the webhook payload.
Webhook Relay agent keeps disconnecting
Ensure your token key and secret are correct. You can generate a new token from the Webhook Relay tokens page. For production use, run the agent as a system service.
GitHub shows webhook delivery failed
Verify that the Webhook Relay agent is running and forwarding to the correct Jenkins URL. Check the Webhook Relay logs page to see if webhooks are being received and forwarded successfully.
Jenkins is not pulling the latest code
Make sure the "GitHub hook trigger for GITScm polling" option is enabled in your Jenkins job configuration. Also verify that Jenkins has proper Git credentials configured if you're using a private repository.
Wrapping it up
Webhooks are not a new thing. A lot of public services use them to notify one another about certain events. The tricky part, however, is when you need them during development or when you have services that are not accessible through the public internet. That's where Webhook Relay offers a straight forward solution to the problem.
P.S. If you are running Jenkins on Kubernetes, check my other blog post here.