
Secure webhooks to Jenkins on Kubernetes
A tutorial on how to securely receive GitHub webhooks on your Jenkins inside a Kubernetes cluster
 Photo by Marat Gilyadzinov
Problem
There is no doubt that Jenkins is a great tool for both CI & CD. However, due to its access to your infrastructure, it becomes an easy target for attackers. For this reason Jenkins is often put behind a firewall and in doing so, webhooks stop working. Users do not want the pull-based but rather prefer the build to start as soon as there is a commit/tag/docker push!
Solution
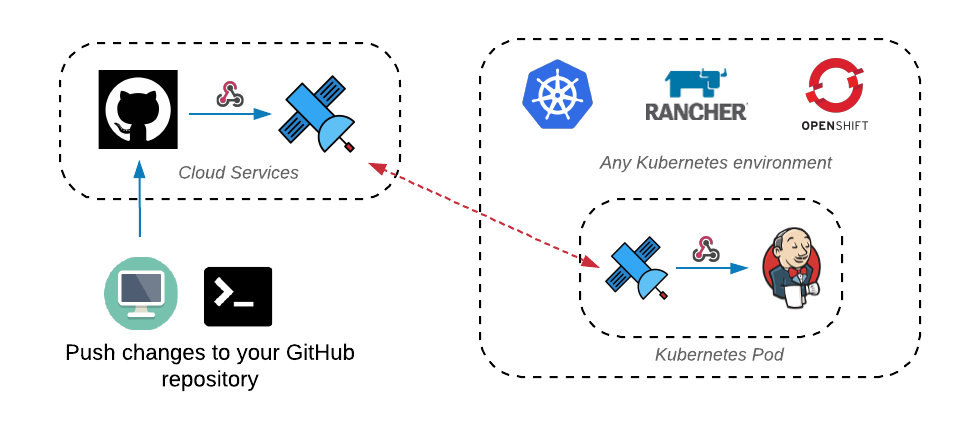
Webhook Relay allows webhooks to start working again in a secure way, i.e. traffic is allowed to go only one way. Main advantages of using Webhook Relay:
- Security for your Jenkins instance by allowing only one-way traffic.
- Your Jenkins instance doesn't have to be exposed to the internet. It can even be running on your local machine without configuring NAT/firewall.
- Auditability (webhook logs can be reviewed).
- Resend webhooks via Webhook Relay dashboard to make testing or adding new integrations easier.
Which providers can work with this approach?
Currently, there is no limitation on which Git (or anything else) can work with this approach so if you are using Github, Gitlab, you will be a perfect candidate. The only limitation at the moment is the webhook size - 3MB. However, this should be sufficient as standard Github webhooks are 8KB size.
Prerequisites
- Webhook Relay account
- Kubernetes environment, we will be using Minikube
- Github account
- Some knowledge about Jenkins
You can use any Kubernetes environment, just one step might be different (getting Jenkins authentication token). Github can be exchanged for Gitlab, as Jenkins supports those webhooks too.
Deployment
Our strategy is quite simple. At first, we create a secret with authentication details to Jenkins. We then deploy a Jenkins instance with Webhook Relay as a sidecar. Once it's deployed, we sign in into Jenkins and create a freestyle project.
Preparing Webhook Relay token and secret
Go to your tokens page and create a token key & secret.
Once this is done, create a Kubernetes secret
kubectl --namespace default create \\
 secret generic webhookrelay-credentials \\
 --from-literal=key=[TOKEN KEY] \\
 --from-literal=secret=[TOKEN SECRET]
This secret will be used by our Webhook Relay sidecar to authenticate to your account and receive your webhooks.
Configuring GitHub webhooks
First, let's create a Webhook Relay bucket to get our public endpoint:
- Go to https://my.webhookrelay.com/buckets
- Click on CREATE BUCKET in the top right corner
- Name bucket 'jenkins' and add sidecar configuration:
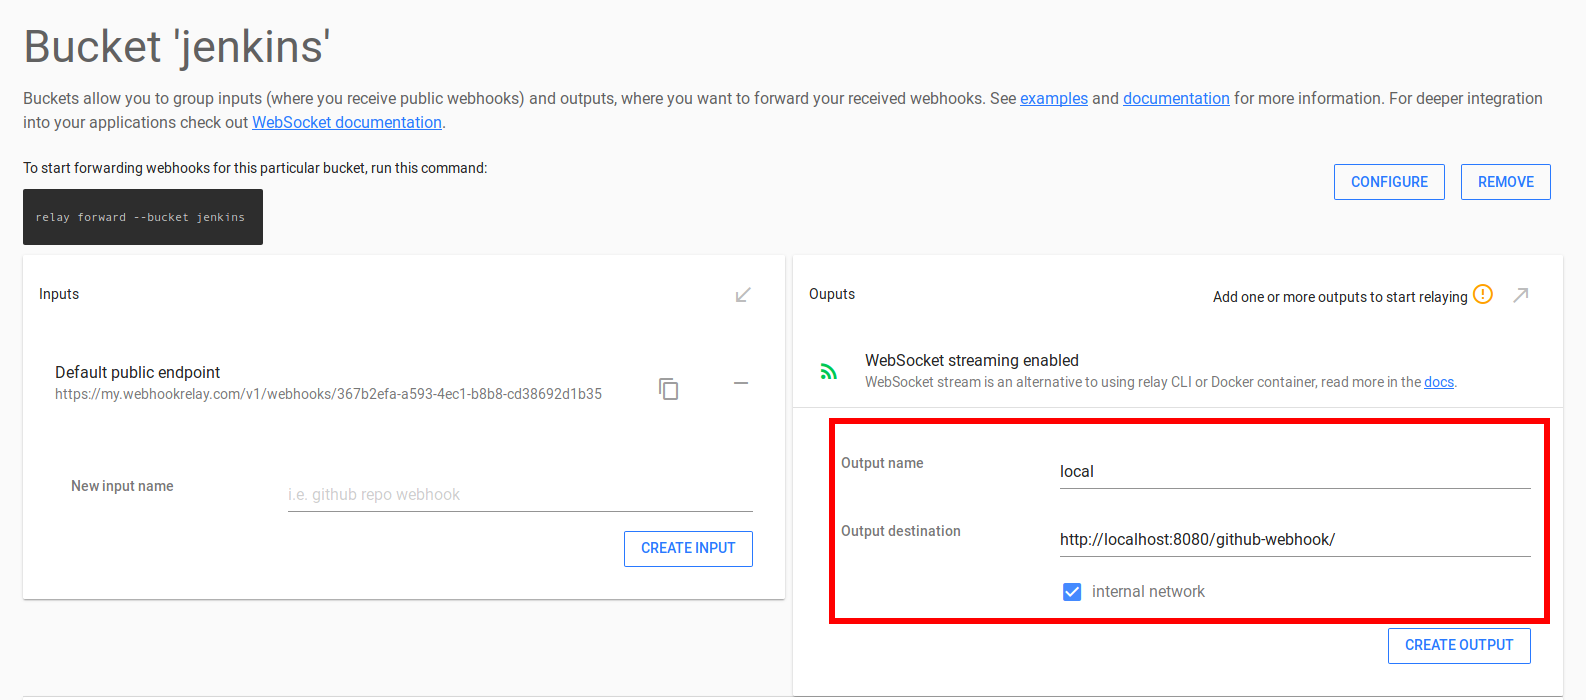
Since our agent will be running as a sidecar, bucket output should be internal and destination should be set to http://localhost:8080/github-webhook/. Copy your input public URL (the one that starts with https://my.webhookrelay.com/v1/webhooks/....) as you will need it in the next step.
- Go to your GitHub repository settings, then click on "Webhooks" and add your Webhook Relay public URL:
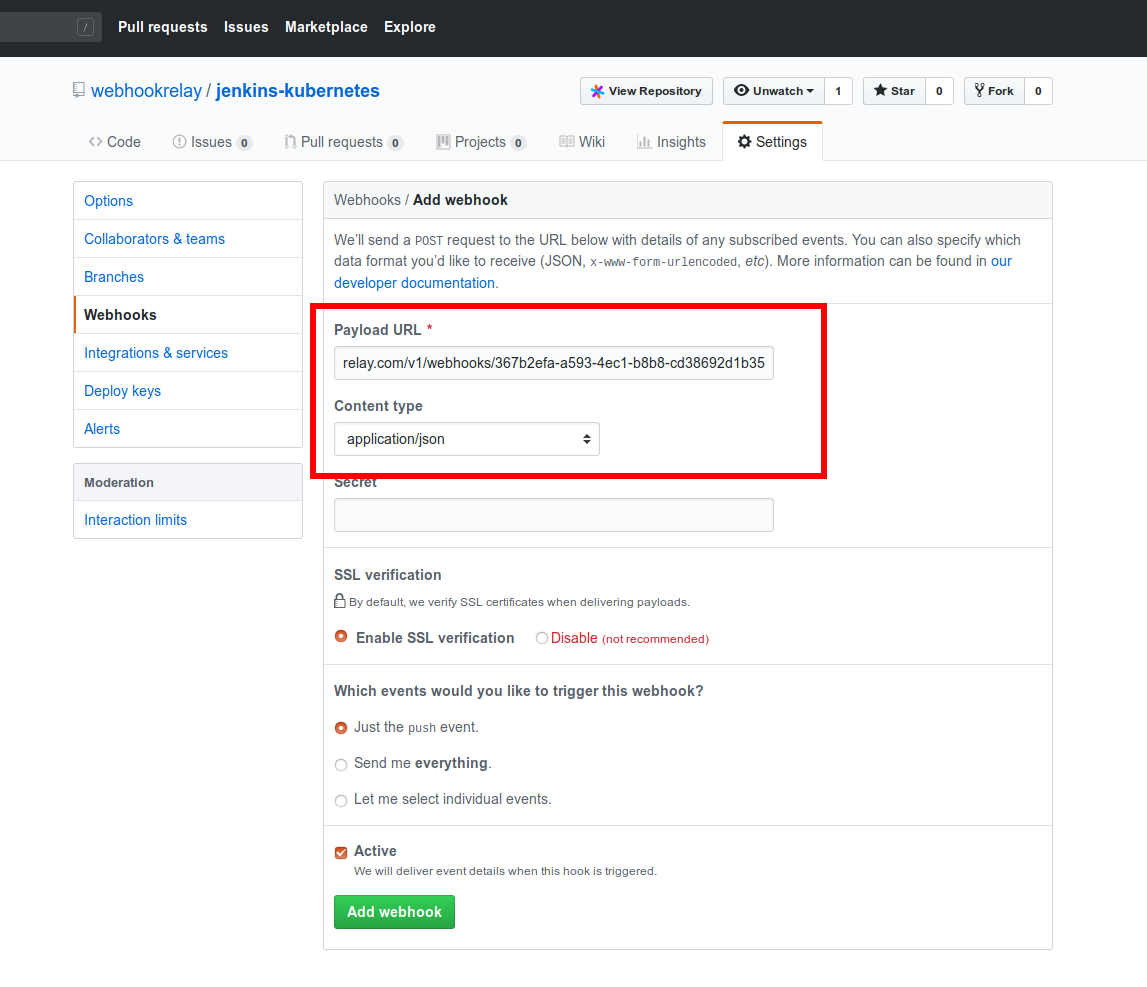
Content type should be JSON.
(Optional) Customizing Jenkins Docker image
In this tutorial we are using a slightly customized Jenkins image that has Golang. There's no reason to add it if you are not using Go. Our Dockerfile:
FROM jenkins/jenkins:latest

EXPOSE 8080 50000

USER root

# RUN add-apt-repository ppa:duh/golang
RUN apt-get update && apt-get install -y golang

ENTRYPOINT ["/sbin/tini", "--", "/usr/local/bin/jenkins.sh"]
If you want to build your own image, just add any necessary steps and run:
docker build -t <your dockerhub username>/jenkins-ci:latest -f Dockerfile .
docker push <your dockerhub username>/jenkins-ci:latest
Create Jenkins deployment
Now, it's time to deploy our Jenkins instance. Save this file and use kubectl to deploy.
# deployment.yaml
apiVersion: apps/v1beta2
kind: Deployment
metadata:
  name: jenkins-ci
  namespace: default
spec:
  replicas: 1
  selector:
    matchLabels:
      app: jenkins-ci
      name: jenkins-ci
  template:
    metadata:
      labels:
        app: jenkins-ci
        name: jenkins-ci
    spec:
      containers:
      - name: jenkins-ci
        imagePullPolicy: Always
        image: karolisr/jenkins-ci:latest
        ports:
        - containerPort: 8080
        - containerPort: 50000
        readinessProbe:
          tcpSocket:
            port: 8080
          initialDelaySeconds: 40
          periodSeconds: 20
        securityContext:
          privileged: true
        volumeMounts:
          - mountPath: /var/run
            name: docker-sock
          - mountPath: /var/jenkins_home
            name: jenkins-home
        resources:
          limits:
            cpu: 300m
            memory: 512Mi
          requests:
            cpu: 150m
            memory: 256Mi
      - name: webhookrelayd
        image: "webhookrelay/webhookrelayd:latest"
        imagePullPolicy: IfNotPresent
        command: ["/relayd"]
        env:
          - name: KEY
            valueFrom:
              secretKeyRef:
                name: webhookrelay-credentials
                key: key
          - name: SECRET
            valueFrom:
              secretKeyRef:
                name: webhookrelay-credentials
                key: secret
          - name: BUCKET
            value: "jenkins"
        resources:
          limits:
            cpu: 100m
            memory: 128Mi
          requests:
            cpu: 50m
            memory: 64Mi
      volumes:
        - name: docker-sock
          hostPath:
            path: /var/run
        - name: jenkins-home
          hostPath:
            path: /var/jenkins_home
---
apiVersion: v1
kind: Service
metadata:
  name: jenkins-ci-lb
spec:
 type: LoadBalancer
 ports:
   - name: jenkins
     port: 8080
     targetPort: 8080
   - name: jenkins-agent
     port: 50000
     targetPort: 50000
 selector:
   name: jenkins-ci
kubectl create -f deployment.yaml
You should see something like this:
$ kubectl apply -f deployment.yaml
deployment.apps/jenkins-ci created
service/jenkins-ci-lb created
$ kubectl get pods
NAME                         READY   STATUS              RESTARTS   AGE
jenkins-ci-975f88b66-pjqjf   0/2     ContainerCreating   0          3
Connecting to your Jenkins
Since we are using minikube:
kubectl get svc
NAME            TYPE           CLUSTER-IP     EXTERNAL-IP   PORT(S)                          AGE
jenkins-ci-lb   LoadBalancer   10.97.25.217   <pending>     8080:30584/TCP,50000:30214/TCP   4m40s
kubernetes      ClusterIP      10.96.0.1      <none>        443/TCP                          18m
echo $(minikube service jenkins-ci-lb --url)
http://192.168.99.100:30584 http://192.168.99.100:30214
Now, you should see Jenkins login screen. Let's retrieve the password:
# token will be on the VM where the Jenkins is running
minikube ssh
# once logged in, get the admin token:
sudo cat /var/jenkins_home/secrets/initialAdminPassword
867888abd88c43f49504db3dc11b64b3
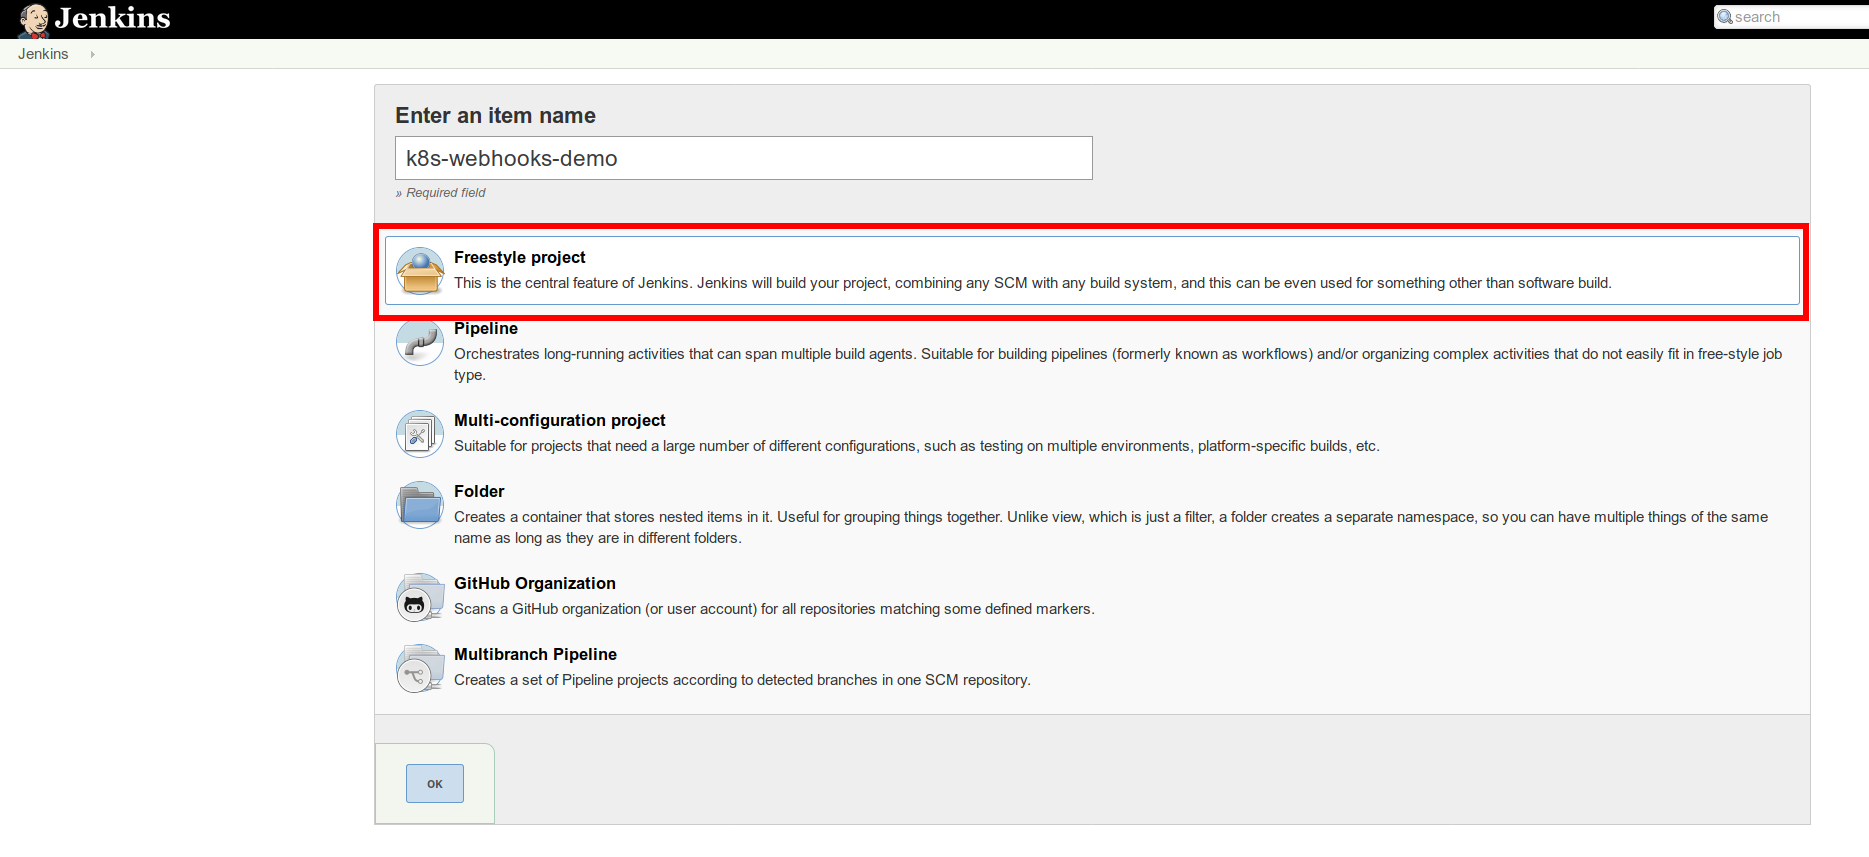
Create a job
Let's choose 'Freestyle Project':
After creating a new job, go to Source Code Management. Now, set Repository URL with your GitHub repository address and tick GitHub hook trigger for GITScm polling. The idea here is that once any push event happens, GitHub will send a webhook and your Jenkins will clone the repository to do the build:

In the build step we will just add a simple 'Execute shell' step:
go test
Save the job.
Push to repository and observe
Now, whenever we push to GitHub, a webhook will be sent through Webhook Relay sidecar to the Jenkins in a secure way. Your Jenkins instance will not be exposed to the internet; only one path at http://localhost:8080/github-webhook/ will be able to accept HTTP requests from outside.
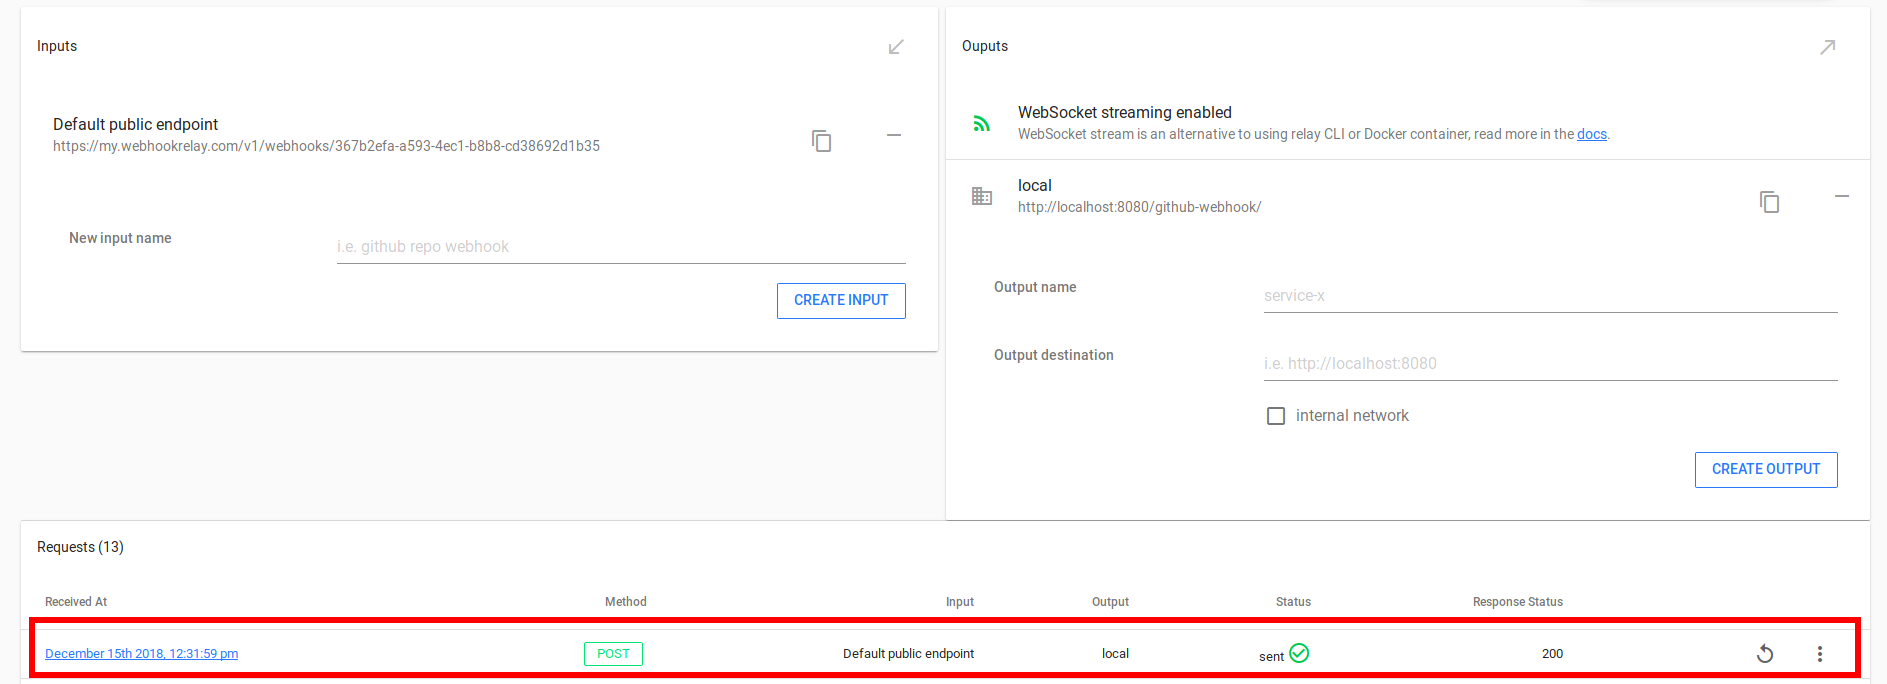
If you go to your Webhook Relay jenkins bucket details, you should see a new request being delivered:
And our Jenkins job result:
Started by GitHub push by rusenask
Building in workspace /var/jenkins_home/workspace/k8s-webhooks-demo
 > git rev-parse --is-inside-work-tree # timeout=10
Fetching changes from the remote Git repository
 > git config remote.origin.url https://github.com/webhookrelay/jenkins-kubernetes # timeout=10
Fetching upstream changes from https://github.com/webhookrelay/jenkins-kubernetes
 > git --version # timeout=10
 > git fetch --tags --progress https://github.com/webhookrelay/jenkins-kubernetes +refs/heads/*:refs/remotes/origin/*
 > git rev-parse refs/remotes/origin/master^{commit} # timeout=10
 > git rev-parse refs/remotes/origin/origin/master^{commit} # timeout=10
Checking out Revision f32e8ceee2f03163dac2532dd82f0db6a84147d5 (refs/remotes/origin/master)
 > git config core.sparsecheckout # timeout=10
 > git checkout -f f32e8ceee2f03163dac2532dd82f0db6a84147d5
Commit message: "updated agent version"
 > git rev-list --no-walk cbc7fcbcda120bf39cf346f8c4d5345b87e402cb # timeout=10
[k8s-webhooks-demo] $ /bin/sh -xe /tmp/jenkins9068732710526083316.sh
+ go test
PASS
ok      _/var/jenkins_home/workspace/k8s-webhooks-demo  0.001s
Finished: SUCCESS
Going further
Once the configuration is in place, you can set the same Webhook Relay input endpoint URL to multiple GitHub repositories. Jenkins GitHub plugin will start correct jobs based on webhook contents.
P.S. If you are not using Kubernetes, check out my other blog post about receiving webhooks on Jenkins without public IP.