
Node-RED OwnTracks location tracking without public IP/MQTT
How to get webhooks from OwnTracks to Node-RED without public IP or configuring NAT
If you want to track your location but don't want it to be shared with way too many companies that shouldn't know it, have a look at this fantastic, Open Source mobile application OwnTracks (https://github.com/owntracks) that can send phone's location data to your chosen server. No external service that aggregates your data is required, allowing you to do pretty much anything you want with the gathered location data. OwnTracks can send payloads either to an MQTT server or a standard HTTP endpoint.
It seems like a lot of people are running MQTT services on cloud providers such as Bluemix and then forward those messages to their private networks that are running at home or some other, firewalled location.
In this short tutorial, we will use Node-RED to receive, process and visualize our location data. Location data will be encrypted during transport with TLS and also using libsodium (secret-key authenticated encryption), right till the end before it reaches the map:
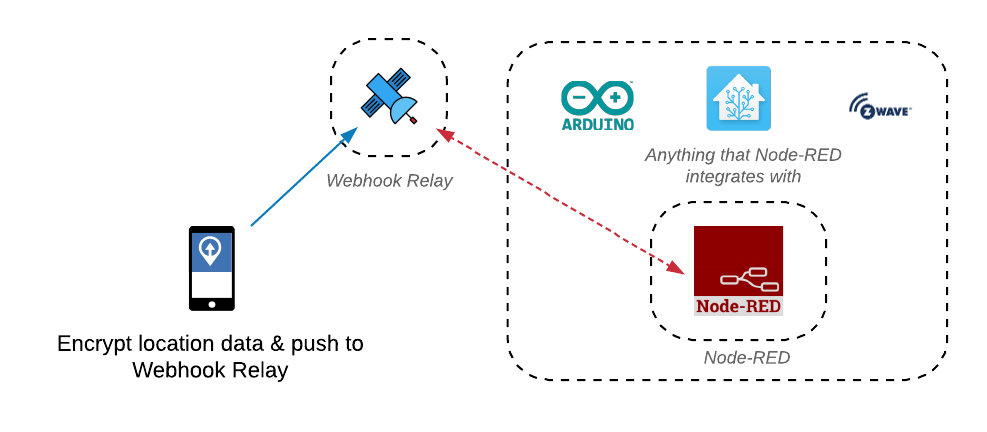
No router, firewall configuration or public IP will be required, as Webhook Relay will be providing a public endpoints to receive webhooks and then send them over to our Node-RED instance over a WebSocket.
If your Node-RED is accessible from the internet, you can skip Webhook Relay part and just add an HTTP handler to handle OwnTracks webhooks. Check Node-RED security docs and ensure that your instance has authentication enabled.
Prerequisites
- Webhook Relay account - instead of MQTT, we will be using HTTP webhooks so we don't have to run a separate service. Also, Webhook Relay enables you to receive webhooks without having a public IP or configuring NAT.
- Node-RED instance - I assume you have it running, if not, installation instructions can be found here.
- node-red-contrib-webhookrelay node so we can subscribe to webhooks.
- node-red-contrib-owntracks node to decrypt location data.
- node-red-contrib-web-worldmap node to display a map and put a location marker on it.
You can either install nodes via npm or click 'Manage Palette' inside the Node-RED settings.
Create a public endpoint for webhooks & install the app
Our location data will be relayed to Node-RED through a public Webhook Relay address. Therefore, the first thing to do will be setting up your endpoint:
- Go to buckets page and click CREATE BUCKET. Name it 'owntracks'. Buckets are a grouping mechanism to aggregate webhooks and fan-out them to multiple destinations. As we will be using WebSockets, we don't need to create outputs (you can create one if you want a resend functionality to work from the web interface).
- Once you create the bucket, note the public endpoint URL which is in the format of
https://my.webhookrelay.com/v1/webhooks/[REPLACE ME WITH YOUR OWN ENDPOINT]. You will need to supply this to your OwnTracks app.
Install & configure the app:
- Go to https://owntracks.org/ and follow instructions based on your phone's operating system.
- Once you have the app, go to the settings and set the mode to HTTP and the endpoint should be set to the Webhook Relay input URL that you got previously. Don't set
Secret encryption keyoption yet, if you want to have a look at the data structure.
Once you have set these settings, you can manually publish your location from the app. Webhook logs should start appearing in your bucket details page or in the logs.
Data structure
If you don't set 'Secret encryption key' inside the OwnTracks application, you can view webhooks on your Webhook Relay logs page. An example payload:
{
    "batt": 69,
    "lon": 0.008261475503538551,
    "acc": 2000,
    "p": 102.94917297363281,
    "vac": 44,
    "topic": "owntracks/kr-1/EEIR6BC7-17AB-57AD-803E-651363E02256",
    "lat": 52.416367098924324,
    "conn": "w",
    "tst": 1546786399,
    "alt": 10,
    "_type": "location",
    "tid": "kr"
}
Since it's a JSON payload, it makes working with it a lot easier. According to Socket Server documentation, our actual payload will be inside payload.body variable when it comes out from the WebSocket. While decrypted data is all nice and good, we can encrypt it to get an additional layer of security on top of already existing TLS. Go ahead to the application and set Secret encryption key to your secret. Now the payload data should look like:
{
    "_type": "encrypted",
    "data": "edxJuWXnAOWvWdIHx1wfu6/IQsRQf5Gs3XFqRY4gQU1p3NLV2Upr8u4u8Lu4p9x+nEPnONKy0Gio1qumdjJV6n+U6YUqkj9mZIUVuyHznNuLM2zzaGKuTFFQeJjo+AjRYtnlK4rSsQou6LnaDcT9lqKYZinWESNWsg6qIKcfx8jsl2f//dSDzH02VBvO0Dg5iqupf9ZWBMuQbO9/EPvBtkaaOt0c41dfQUR3+4YY8cQx+FXB9yWHPyuyKlxAU+vAgSo6QAyJE4h4z9ZuD4y5SYkZ35Rp+QS8tsI0CNTUzA551Jo4EsWl7dwcTfbYyQB+7sDU3yFhD3oLAuwPOCRdvHLlpGS0G3D6T/ujU8pKkJj5ldT8Sw=="
}
Creating the flow
The actual flow is straightforward once we know what kind of data we are receiving and what kind of data the world map expects. Let's see what kind of configuration is required according to node-red-contrib-web-worldmap:
msg.payload = { name:"Jason", lat:51.05, lon:-1.35 }
We can also include icon field to distinguish multiple trackers.
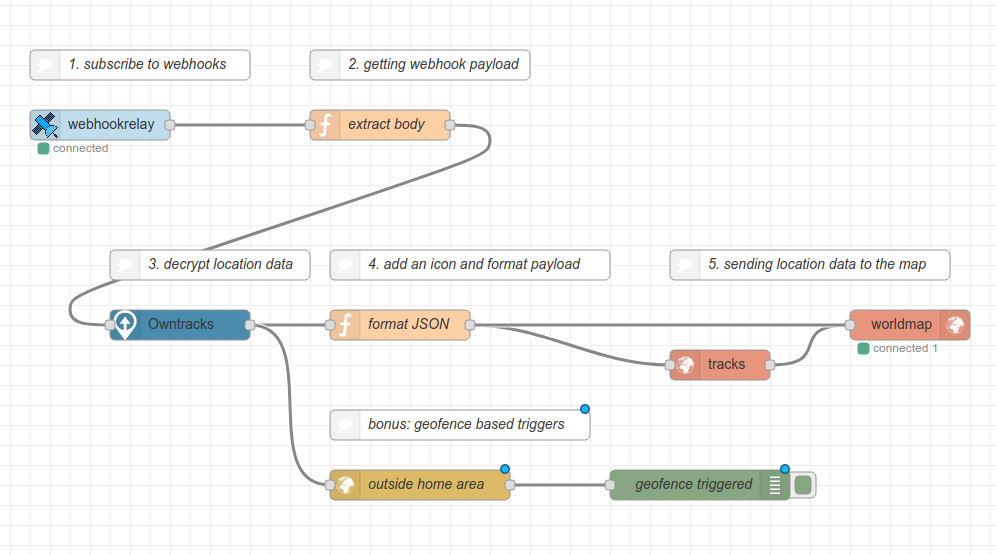
Step 1: getting the data
We will be using node-red-contrib-webhookrelay node to receive webhooks from Webhook Relay bucket that is receiving OwnTracks webhooks. Go to the tokens page, generate a key & secret token pair and add them to the node. Set bucket to owntracks (it has to match the bucket name in Webhook Relay that is receiving the webhooks). Once it's there, try deploying the flow and see whether the node goes into connected state.
Step 2: extracting the payload
Webhook Relay node messages contain bucket metadata, headers, request query, method, and body. However, in this case, we only care about the body so let's extract it. Create a function node with the following code:
return {
    payload: msg.payload.body
};
Step 3: decrypt OwnTracks location data
Once we have the payload, we need to decrypt it. Add node-red-contrib-owntracks node and connect an output from step 2 into it. Open node settings and set the same secret as you set in your phone's app (Secret encryption key). No additional configuration is required here, it will return the original, decrypted payload.
Step 4: format JSON
In this step, we can customize decrypted location data before passing it into the world map node. The following example just adds an icon, but feel free to modify it however you want according to the docs:
return {
    payload: {
        name: msg.payload.tid,
        lat: msg.payload.lat,
        lon: msg.payload.lon,
        icon: 'user-circle-o'
    }
};
Step 5: sending location data to the map
This step is quite simple. Connect the output from step 4 to both worldmap and tracks nodes. This will always update the pointer on the map while sending data also to the tracks node which draws lines on the map as the object moves. Configure the worldmap node with an increased Max Age and also configure the tracked points on the tracks node to whatever number you like.
State management
By default, world map component will only display real-time information of newly created location tracking points. You can use status node to get the status from the world map when new sessions are connected and just replay the data. You can store points in postgres or sqlite, depending on your needs. If you only care about geofence actions, state is probably not required.
Bonus: geofence triggers
You can connect also ingest data from the OwnTracks decryption node with node-red-node-geofence node to create geofence based triggers:

Use this to create automated actions that get triggered when trackers leave or enter areas (for example your car leaving the town while your phone is at home at 3 am).
Bonus: Home Assistant
If you are using Home Assistant and find yourself behind double NAT from your ISP or just can't have a public IP, have a look at our add-on to create secure, TLS pass-through tunnels for remote access. Detail documentation can be found here.
References
- An excellent article about decrypting OwnTracks location data: https://www.hardill.me.uk/wordpress/2016/04/26/owntracks-encrypted-location-node-red-node/
- Webhook Relay Node-RED guide