Responding to API calls using Node-RED Webhook Relay node
How to respond to API calls using Node-RED Webhook Relay node

In the previous article about controlling gadgets via IFTTT and Node-RED we explored ways to receive webhooks without public IP or configuring NAT and then performing certain actions. However, sometimes you need to respond back to the webhook producers or just other applications that expect success/error responses to properly function. Up until now you would have needed to use Webhook Relay tunnels but with the recent release, we allow sending dynamic responses back to the caller.
Pros:
- No need to expose your Node-RED to the internet.
- Respond with carefully crafted HTTP responses choosing your status code, headers and body.
This feature transforms Webhook Relay webhook forwarding feature from unidirectional-only to a much more powerful tool.
How it works
Webhook responses work by pausing HTTP response for up to 10 seconds while waiting for the response. The rules are simple:
- You have to explicitly declare on the Webhook Relay output (via relay CLI or web dashboard) that it should wait for the response.
- Your application has to send response back to the incoming webhook within 10 seconds.
- Response cannot be larger than 3MB (usually API responses are a lot smaller).
- Response has to include original
metaobject that you have received with the webhook (it contains unique request ID and bucket ID that are required by Webhook Relay to correctly respond)
Creating an API with Node-RED and Webhook Relay node
We will create a simple API backend that will return current weather information for a selected city:
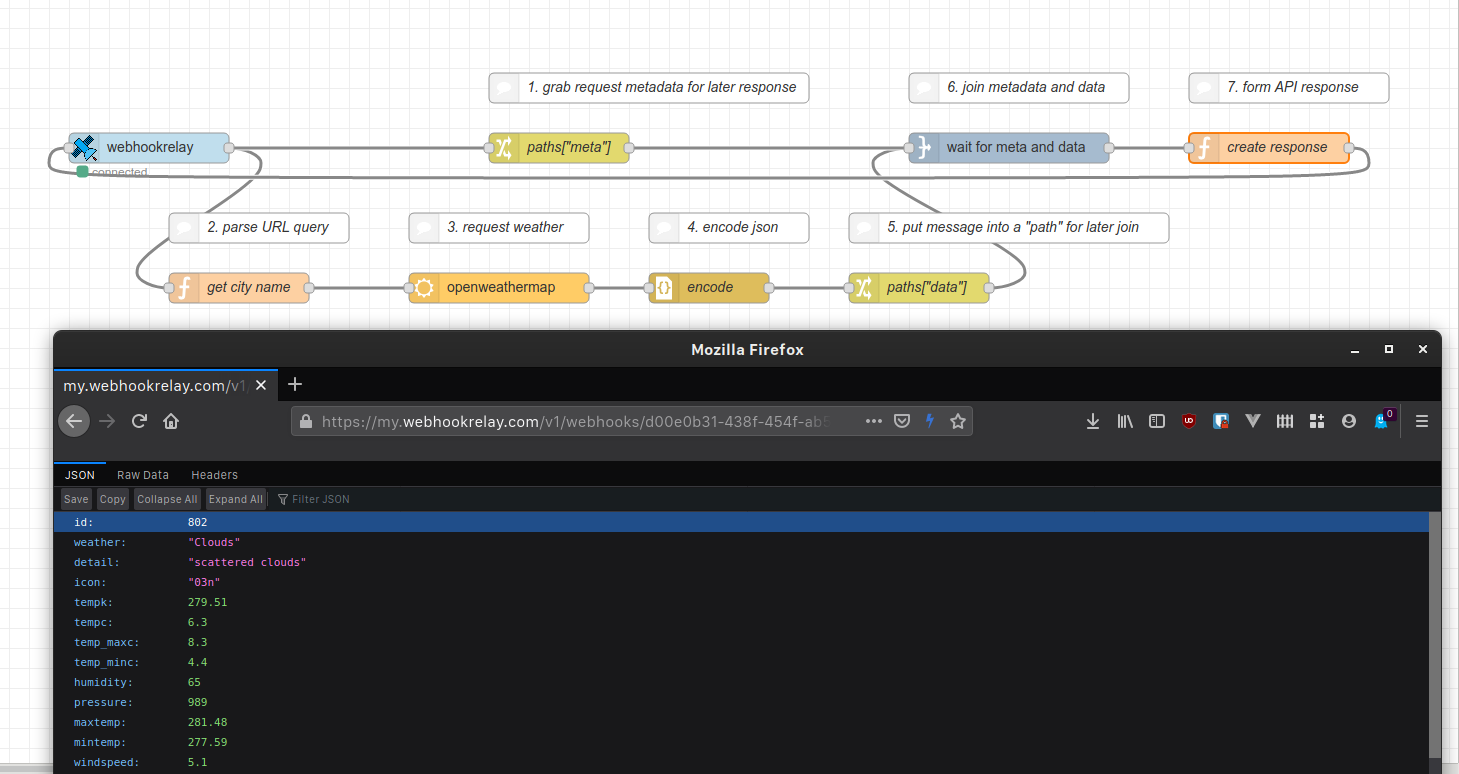
Here we will use several custom nodes nodes:
- node-red-contrib-webhookrelay - you can find node installation instructions in the official docs.
- node-red-contrib-wait-paths
- node-red-node-openweathermap
Other nodes are from the standard palette.
Note that: We need to preserve
payload.metaobject from the original Webhook Relay message as we will be using it to reply to the correct request. Your application has 10 seconds to send a reply and there might be several request in-flight that Node-RED is dealing with.
Webhook Relay node configuration
- Go to buckets page and create a new bucket.
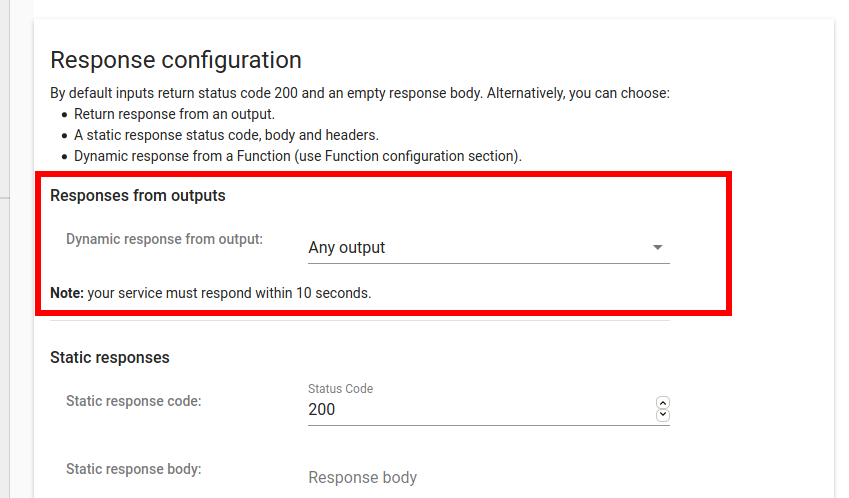
- Once you have a bucket, open Input settings and select that it should wait for a reply from "Any output":
- Go to tokens page and get your key/secret pair.
- Add bucket name and token key/secret pair to the
node-red-contrib-webhookrelaynode.
Configuring the flow
- grab request metadata for later response
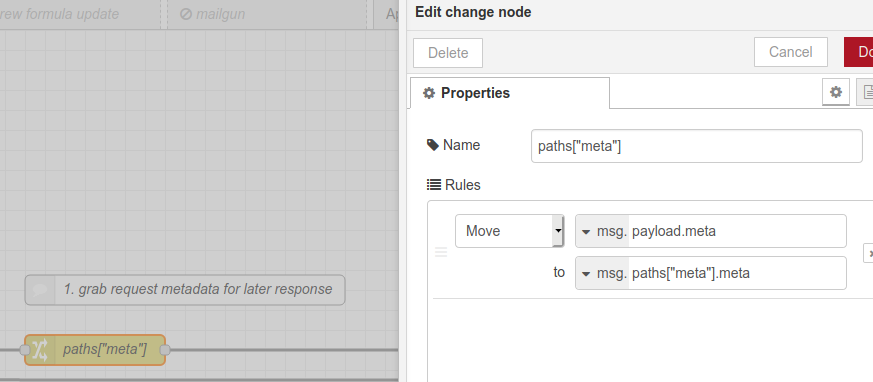
We will have to join this later with the rest of the data to correctly respond to the caller.
- parse URL query
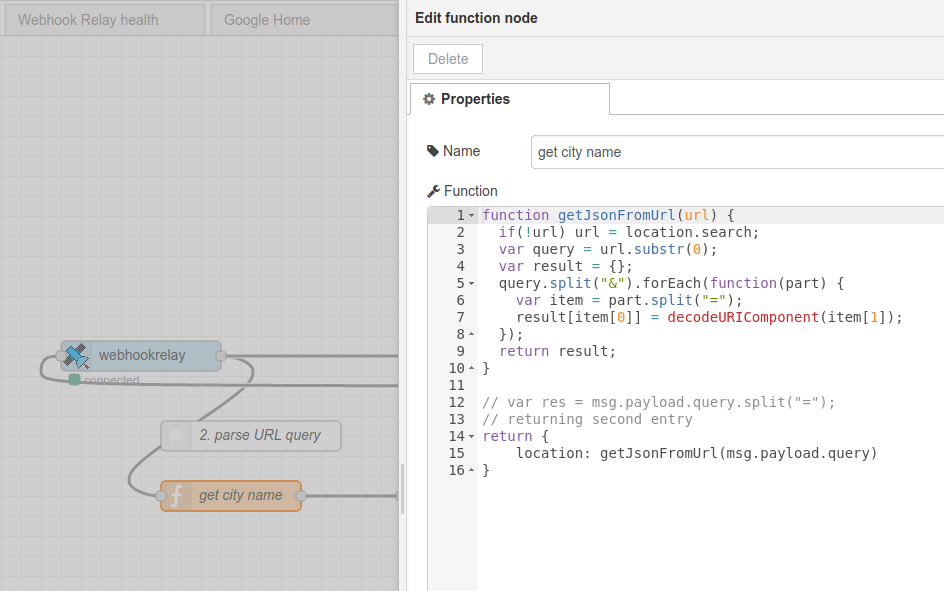
now, since we HTTP requests with a query like ?city=London&country=GB, we need to get these details into an object that openweather node will understand. Here's the code:
function getJsonFromUrl(url) {
  if(!url) url = location.search;
  var query = url.substr(0);
  var result = {};
  query.split("&").forEach(function(part) {
    var item = part.split("=");
    result[item[0]] = decodeURIComponent(item[1]);
  });
  return result;
}

return {
    location: getJsonFromUrl(msg.payload.query)
}
- request weather
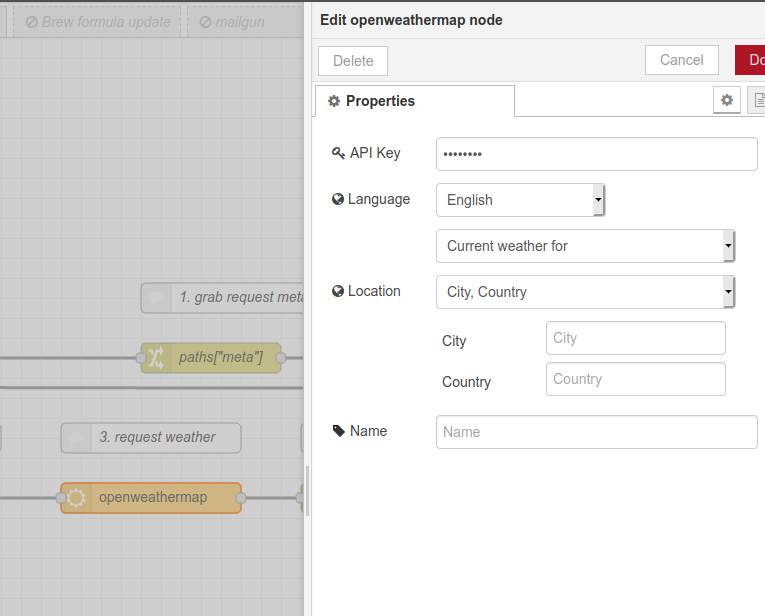
- encode JSON data - here we just take the response from openweather response and encode it into a JSON string. This payload will be returned to the caller.
- put message into a "path" for later join - same as number 1:
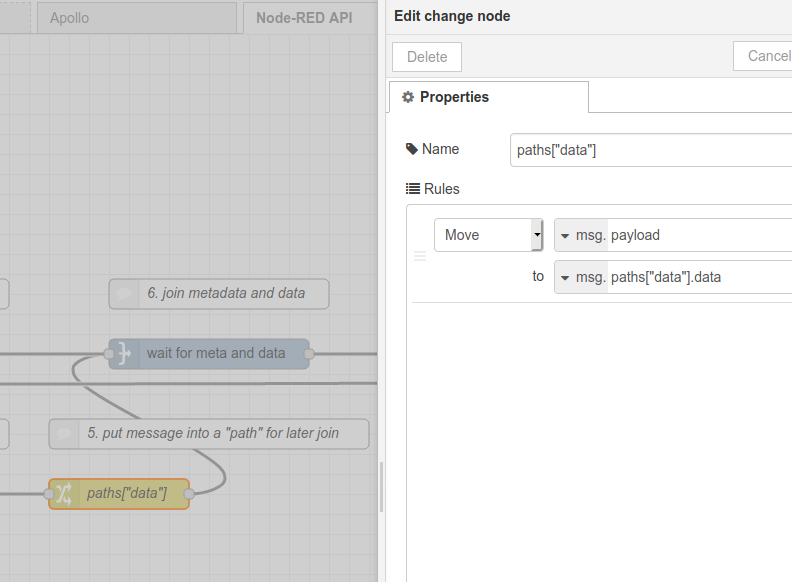
- join metadata and data - time to join weather data and request metadata:
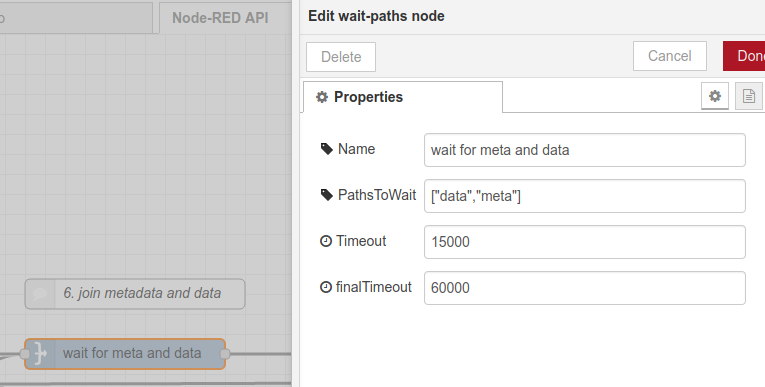
- form API response - use "function" node to grab "meta" and "data" values from the previous node
return {
  meta: msg.paths["meta"].meta,  // this is original meta field from the payload (it's important to include it so we have the message ID)
  status: 200,   // status code to return (200, 201, 400, etc)
  body: msg.paths["data"].data, // body
  headers: {
    'content-type': ['application/json']  // good practice to include content type, browsers do their best to display it nicely
  }
};
That's it, connect the response node back to the Webhook Relay node and open your Bucket's input URL in your browser or just use curl (if you are on Linux or Mac):
curl https://my.webhookrelay.com/v1/webhooks/YOUR-INPUT-UUID?city=London&country=GB
What's next
Try out integrating different APIs. If free tier is too low for you, message me and I will bump up your limits :)
Here's the flow itself, feel free to import and play with it.
[{"id":"44a1295a.6a99d","type":"tab","label":"Node-RED API","disabled":false,"info":""},{"id":"5b239f76.3f86d8","type":"webhookrelay","z":"44a1295a.6a99d","buckets":"node-red-responses","x":160,"y":320,"wires":[["329e9d6b.728d6a","8858f09a.c7aee8"]]},{"id":"ee1d7dc4.e7c358","type":"function","z":"44a1295a.6a99d","name":"create response","func":"return {\n meta: msg.paths[\"meta\"].meta, // this is original meta field from the payload (it's important to include it so we have the message ID)\n status: 200, // status code to return (200, 201, 400, etc)\n\tbody: msg.paths[\"data\"].data, // body\n\theaders: {\n\t 'content-type': ['application/json']\n\t}\n};","outputs":1,"noerr":0,"x":1280,"y":320,"wires":[["5b239f76.3f86d8"]]},{"id":"c3ea1e3b.a8c708","type":"openweathermap","z":"44a1295a.6a99d","name":"","wtype":"current","lon":"","lat":"","city":"","country":"","language":"en","x":510,"y":460,"wires":[["27524c01.87056c"]]},{"id":"329e9d6b.728d6a","type":"function","z":"44a1295a.6a99d","name":"get city name","func":"function getJsonFromUrl(url) {\n if(!url) url = location.search;\n var query = url.substr(0);\n var result = {};\n query.split(\"&\").forEach(function(part) {\n var item = part.split(\"=\");\n result[item[0]] = decodeURIComponent(item[1]);\n });\n return result;\n}\n\nreturn {\n location: getJsonFromUrl(msg.payload.query)\n}","outputs":1,"noerr":0,"x":250,"y":460,"wires":[["c3ea1e3b.a8c708"]]},{"id":"27524c01.87056c","type":"json","z":"44a1295a.6a99d","name":"encode","property":"payload","action":"","pretty":false,"x":720,"y":460,"wires":[["13242f86.520e8"]]},{"id":"cf7bfe30.6a52b8","type":"wait-paths","z":"44a1295a.6a99d","name":"wait for meta and data","paths":"[\"data\",\"meta\"]","timeout":15000,"finalTimeout":60000,"x":1020,"y":320,"wires":[["ee1d7dc4.e7c358"]]},{"id":"13242f86.520e8","type":"change","z":"44a1295a.6a99d","name":"paths[\"data\"]","rules":[{"t":"move","p":"payload","pt":"msg","to":"paths[\"data\"].data","tot":"msg"}],"action":"","property":"","from":"","to":"","reg":false,"x":930,"y":460,"wires":[["cf7bfe30.6a52b8"]]},{"id":"8858f09a.c7aee8","type":"change","z":"44a1295a.6a99d","name":"paths[\"meta\"]","rules":[{"t":"move","p":"payload.meta","pt":"msg","to":"paths[\"meta\"].meta","tot":"msg"}],"action":"","property":"","from":"","to":"","reg":false,"x":570,"y":320,"wires":[["cf7bfe30.6a52b8"]]},{"id":"78312bed.0624fc","type":"comment","z":"44a1295a.6a99d","name":"1. grab request metadata for later response","info":"","x":660,"y":260,"wires":[]},{"id":"d13cd56d.3e6a08","type":"comment","z":"44a1295a.6a99d","name":"2. parse URL query","info":"","x":270,"y":400,"wires":[]},{"id":"b0668370.e60a88","type":"comment","z":"44a1295a.6a99d","name":"3. request weather","info":"","x":510,"y":400,"wires":[]},{"id":"a9a0d2e1.527298","type":"comment","z":"44a1295a.6a99d","name":"4. encode json","info":"","x":740,"y":400,"wires":[]},{"id":"fe57aa5.43ee4d8","type":"comment","z":"44a1295a.6a99d","name":"5. put message into a \"path\" for later join","info":"","x":1020,"y":400,"wires":[]},{"id":"d0d96c0d.930398","type":"comment","z":"44a1295a.6a99d","name":"6. join metadata and data","info":"","x":1030,"y":260,"wires":[]},{"id":"f25f94a5.7ad5d8","type":"comment","z":"44a1295a.6a99d","name":"7. form API response","info":"","x":1300,"y":260,"wires":[]}]

