
How Lightning AI uses WHR to ship webhooks to the entire team
How Lightning AI uses Webhook Relay container to broadcast Stripe webhooks to every developer's laptop and staging environment simultaneously - zero setup required
When building SaaS applications with Stripe, testing webhook integrations locally is often a pain point. Traditional approaches involve ngrok tunnels, the Stripe CLI, or mock data - all requiring manual setup for each developer. What if your entire team could receive real Stripe webhooks without any individual configuration?
The Challenge: Stripe Webhooks in Team Development
If you're building a SaaS product with Stripe, you know webhooks are critical for:
- Updating subscription statuses
- Tracking payment successes and failures
- Managing customer credits
- Handling plan upgrades and downgrades
But getting webhooks working locally for a team is traditionally difficult:
- Each developer needs to set up tunneling tools
- Webhook URLs need constant updating in Stripe dashboard
- Team members need Stripe dashboard access just to test
- Debugging requires access to production webhook logs
- New team members face lengthy setup processes
The Solution: Broadcast Webhooks to Everyone
Here's a better approach that we used for Lightning AI: configure Stripe to send all webhooks to Webhook Relay once, then broadcast them simultaneously to:
- Every developer's local environment
- Your staging server
- Any other environments that need them
The beauty? Each backend can decide whether to process or ignore webhooks based on whether it has that particular customer in its database.
How It Works
- Stripe sends all webhooks to Webhook Relay - Configure this once in your Stripe dashboard
- Everyone runs the same docker-compose setup - Web server, database, and Webhook Relay container
- Webhooks are broadcasted everywhere - All environments receive all webhooks simultaneously
- Smart filtering happens in your backend - Each instance checks if it has the customer by
customer_idand processes or ignores accordingly - Zero individual setup - New team members just run
docker-compose upand they're done
Setting Up Your Docker Compose
We will follow Docker Compose setup instructions and here's what the configuration looks like:
# Example docker-compose.yml file
services:
  # Your main API service
  api:
    build:
      context: .
      dockerfile: Dockerfile
    ports:
      - "8080:8080"
    restart: always
    env_file:
      - .env
  # Database
  postgresql:
    image: "postgres:latest"
    ports:
      - "5432:5432"
  # Webhook Relay container forwarding to http://api:8080/webhooks
  webhookrelay:
    image: webhookrelay/webhookrelay:latest
    restart: always
    environment:
      # Authentication
      - RELAY_KEY=${RELAY_KEY}
      - RELAY_SECRET=${RELAY_SECRET}
      - BUCKETS=stripe-dev
That's it! The Webhook Relay container automatically connects to your configured bucket and starts forwarding webhooks to http://api:8080/webhooks.
Configuration Steps
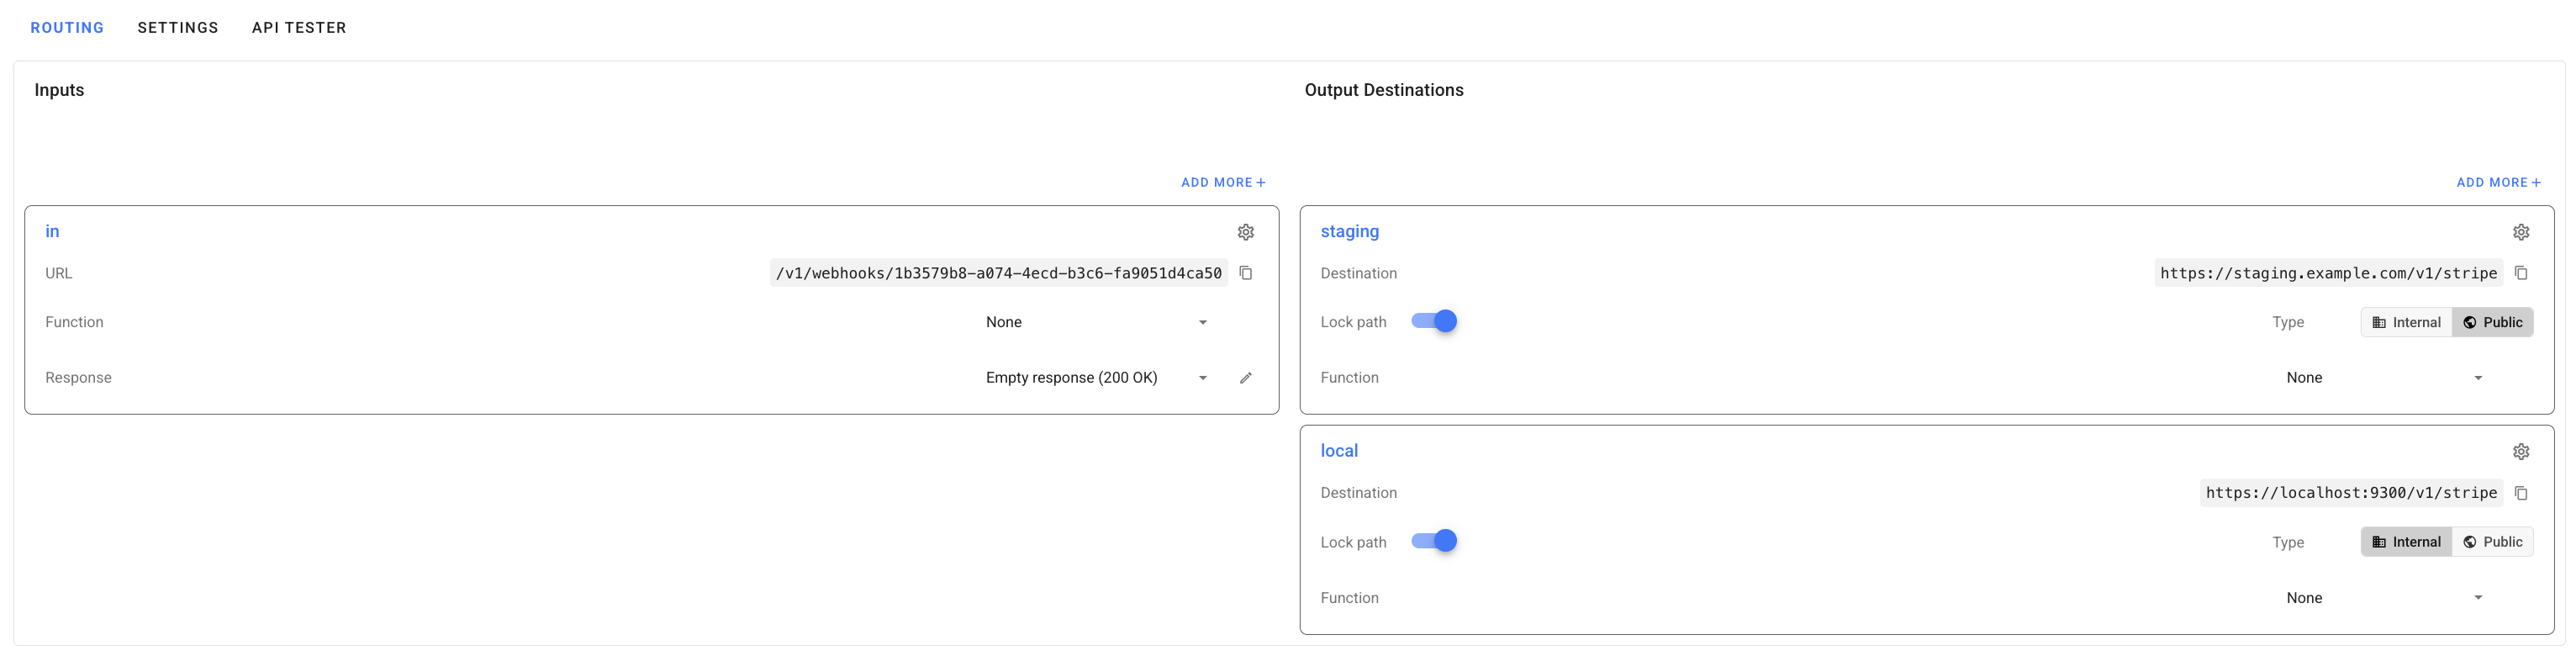
1. Create Your Webhook Relay Bucket
- Sign up for a Webhook Relay account
- Create a new bucket called
stripe-dev - Add multiple outputs:
- Internal destination:
http://api:8080/webhooks(for docker-compose) - Staging:
https://staging.yourapp.com/webhooks - Any other environments
- Internal destination:
2. Configure Stripe
- Go to your Stripe Dashboard → Developers → Webhooks
- Add a webhook endpoint with your Webhook Relay input URL (e.g.,
https://your-bucket.hooks.webhookrelay.com) - Select the events you want to receive (or select all)
- Copy your webhook signing secret for verification
3. Set Up Team Access
Add your RELAY_KEY and RELAY_SECRET to your team's shared configuration:
- Generate API keys from your Webhook Relay account settings
- Add them to your
.env.examplefile:
RELAY_KEY=your-key-here
RELAY_SECRET=your-secret-here
STRIPE_WEBHOOK_SECRET=whsec_...
- Team members copy
.env.exampleto.envwith the shared credentials
4. Implement Smart Webhook Filtering
Your backend should check whether it should process each webhook:
app.post('/webhooks', async (req, res) => {
  const sig = req.headers['stripe-signature'];
  let event;

  try {
    event = stripe.webhooks.constructEvent(req.body, sig, process.env.STRIPE_WEBHOOK_SECRET);
  } catch (err) {
    return res.status(400).send(`Webhook Error: ${err.message}`);
  }

  // Extract customer ID from the event
  const customerId = event.data.object.customer;

  // Check if this customer exists in our local database
  const customer = await db.customers.findOne({ stripeCustomerId: customerId });

  if (!customer) {
    // This webhook isn't for us - another environment will handle it
    console.log(`Ignoring webhook for unknown customer: ${customerId}`);
    return res.json({ received: true, processed: false });
  }

  // Process the webhook for our customer
  switch (event.type) {
    case 'customer.subscription.updated':
      await handleSubscriptionUpdate(customer, event.data.object);
      break;
    case 'invoice.payment_succeeded':
      await handlePaymentSuccess(customer, event.data.object);
      break;
    case 'customer.subscription.deleted':
      await handleSubscriptionCancellation(customer, event.data.object);
      break;
    // ... handle other events
  }

  res.json({ received: true, processed: true });
});
The Benefits
1. Zero Setup for New Team Members
New developers just need to:
git clone your-repo
cp .env.example .env
docker-compose up
That's it! They're immediately receiving real Stripe webhooks.
2. No Stripe Dashboard Access Required
Team members don't need access to your Stripe dashboard to:
- Test webhook integrations
- Debug webhook issues
- Develop subscription features
- Verify payment flows
3. Built-in Debugging
Webhook Relay provides a dashboard where you can:
- See all webhook requests and responses
- Inspect headers and payloads
- Replay individual webhooks
- View error messages and status codes
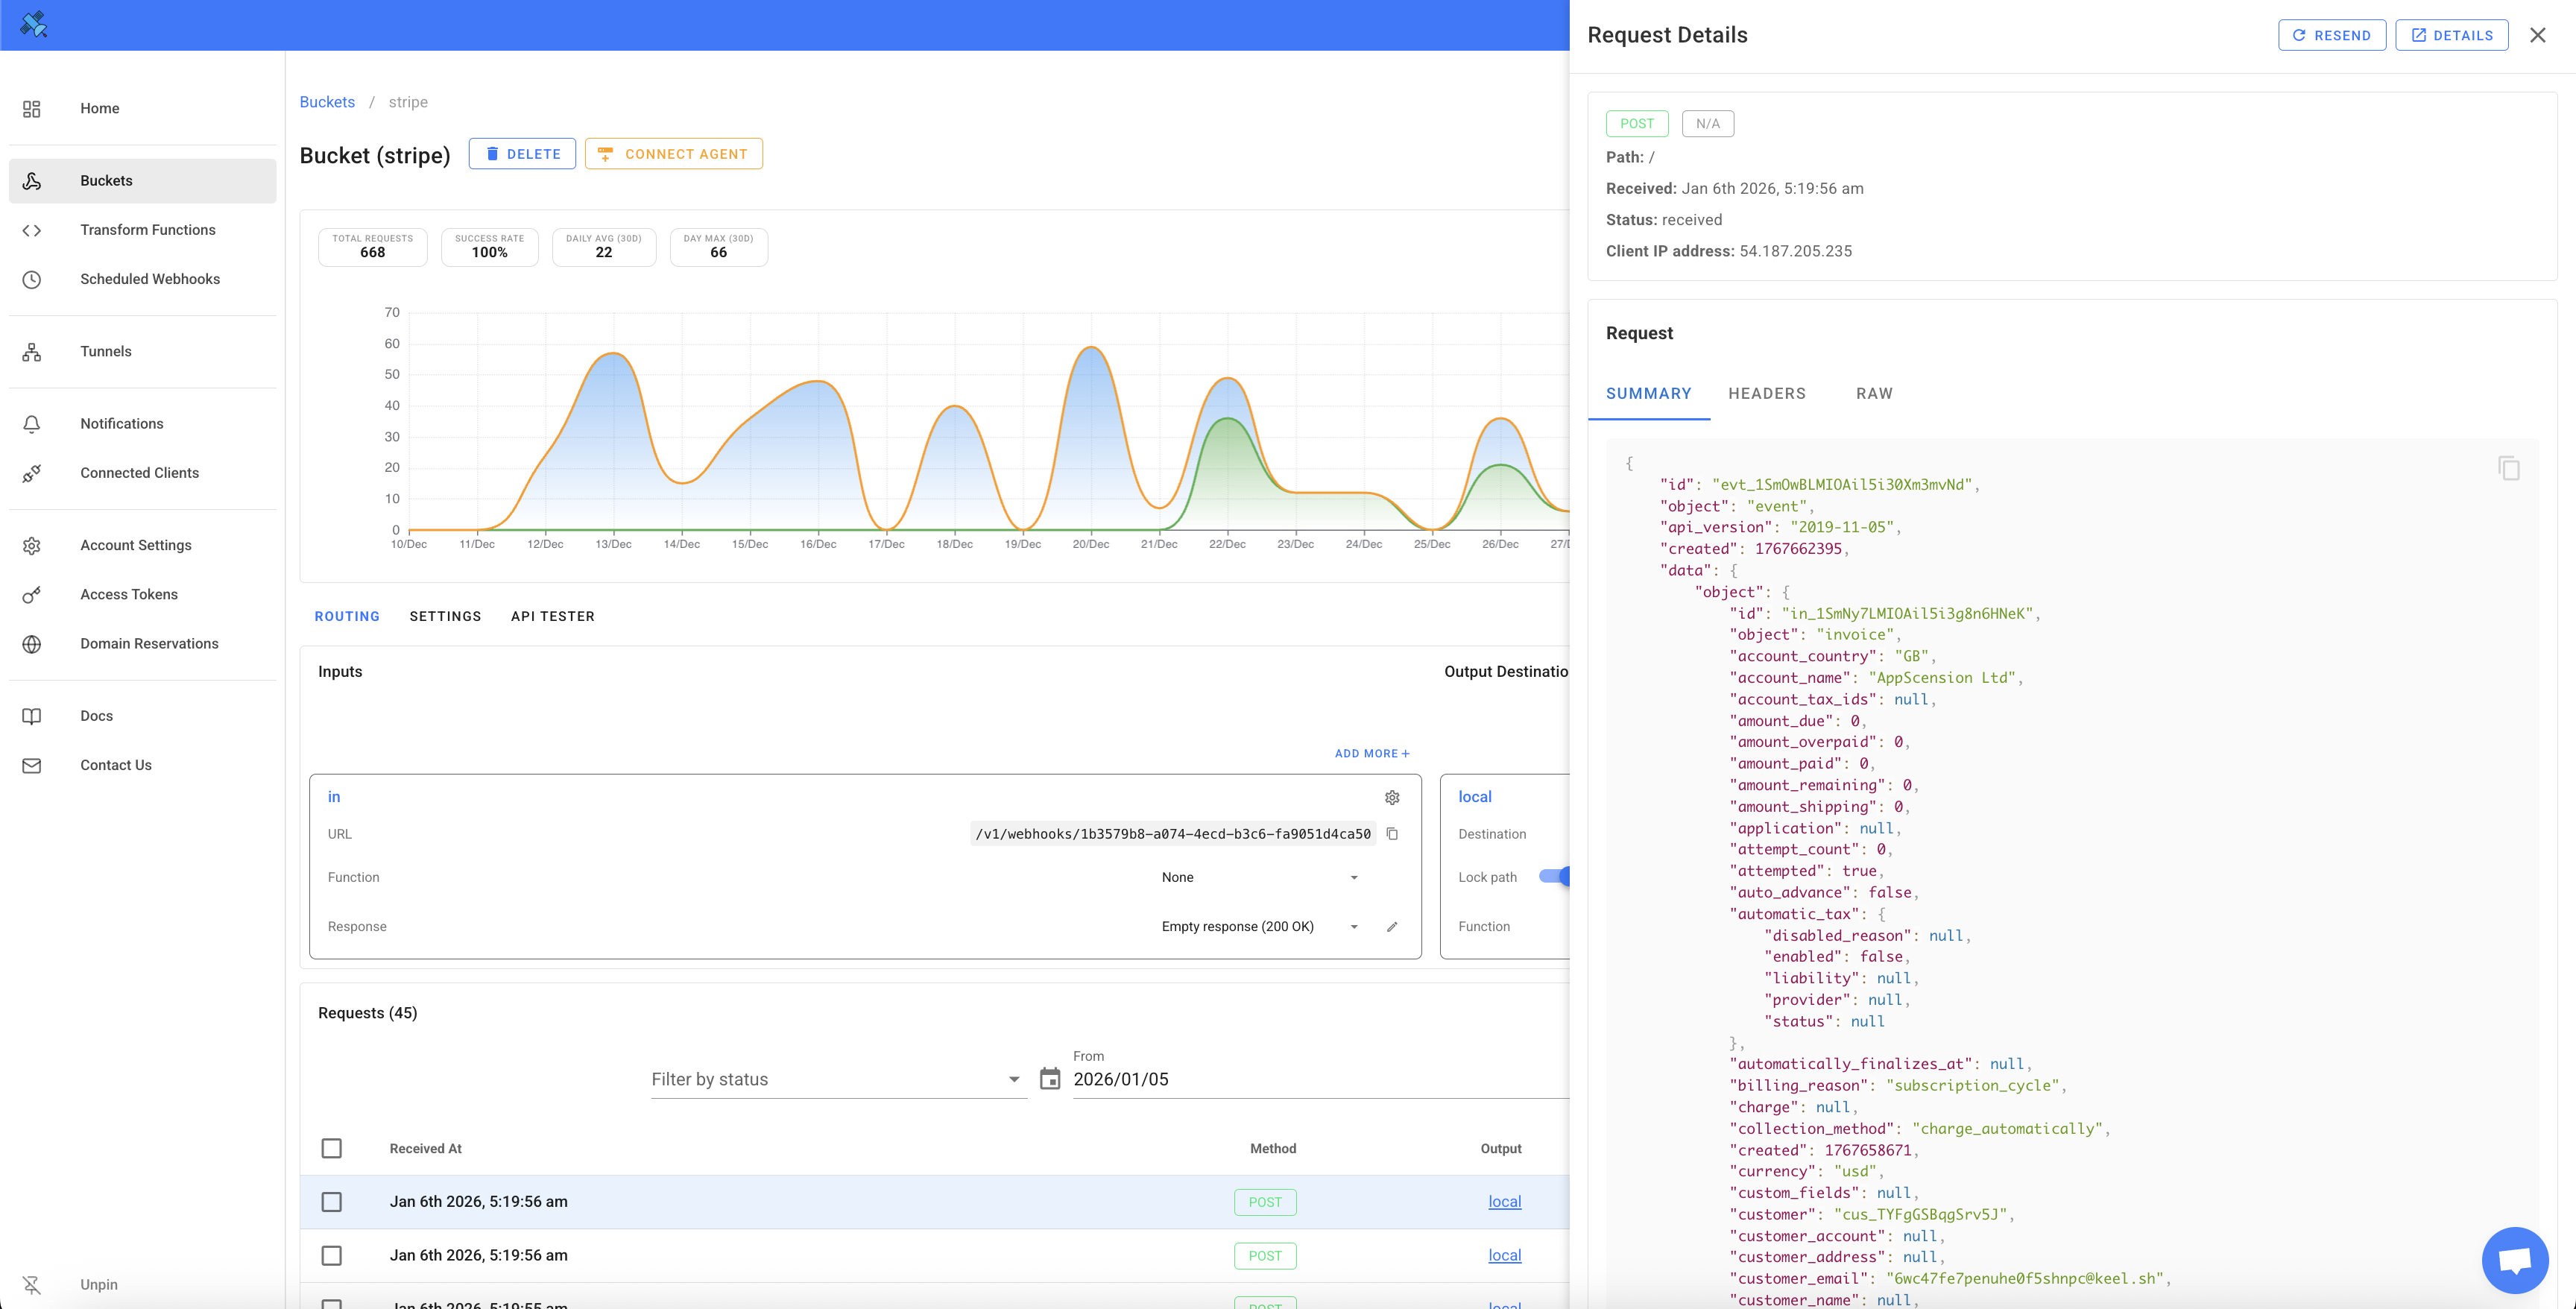
Team members can debug their webhook handling without bothering DevOps or needing production access.
4. Test with Real Data
Instead of mocking Stripe webhooks, your team works with:
- Real webhook payloads
- Actual Stripe event structures
- Production-like timing and sequences
- Real edge cases you might not think to mock
5. Multiple Environments Simultaneously
The same webhook gets delivered to:
- Your local machine
- Your coworker's local machine
- The staging server
- The QA environment
Each processes only the webhooks relevant to its data.
Real-World Example
Let's say you're testing a subscription upgrade:
- You use Stripe's test mode to upgrade a test customer
- Stripe sends
customer.subscription.updatedwebhook - Webhook Relay broadcasts it to all environments
- Your local database has this test customer → processes the webhook → updates the subscription
- Your coworker's local database doesn't have this customer → ignores it
- Staging has this customer → also processes it
- Production (different bucket) isn't affected
Everyone can test independently with their own test customers, all receiving real webhooks simultaneously.
Advanced: Environment-Specific Buckets
For even better isolation, you can create separate buckets:
stripe-production- Only production server listensstripe-staging- Staging + all developersstripe-feature-x- Only developers working on feature X
This gives you fine-grained control over webhook distribution.
Troubleshooting
Webhooks not arriving?
- Check your Webhook Relay dashboard to confirm webhooks are being received
- Verify the bucket name in your docker-compose matches your configuration
- Ensure your
RELAY_KEYandRELAY_SECRETare correct - Check the logs of webhookrelay container to see if it's receiving webhooks
Webhooks failing verification?
Make sure you're using the correct STRIPE_WEBHOOK_SECRET for webhook signature verification. This should match the secret shown in your Stripe dashboard for the webhook endpoint.
Conclusion
By using Webhook Relay with Docker Compose, you can:
✅ Configure Stripe webhooks once, use everywhere
✅ Onboard new developers in minutes
✅ Test with real webhook data locally
✅ Debug without Stripe dashboard access
✅ Support multiple environments simultaneously
This approach scales from solo developers to large teams, and from local development to complex staging environments. The smart filtering pattern ensures each environment only processes webhooks relevant to its data, while the broadcast pattern ensures everyone has access to real webhook events.
Ready to simplify your Stripe webhook development? Sign up for Webhook Relay and get your team up and running in minutes.