Terraform Atlantis
Securely forward webhooks to Terraform Atlantis in Kubernetes cluster using Webhook Relay Operator

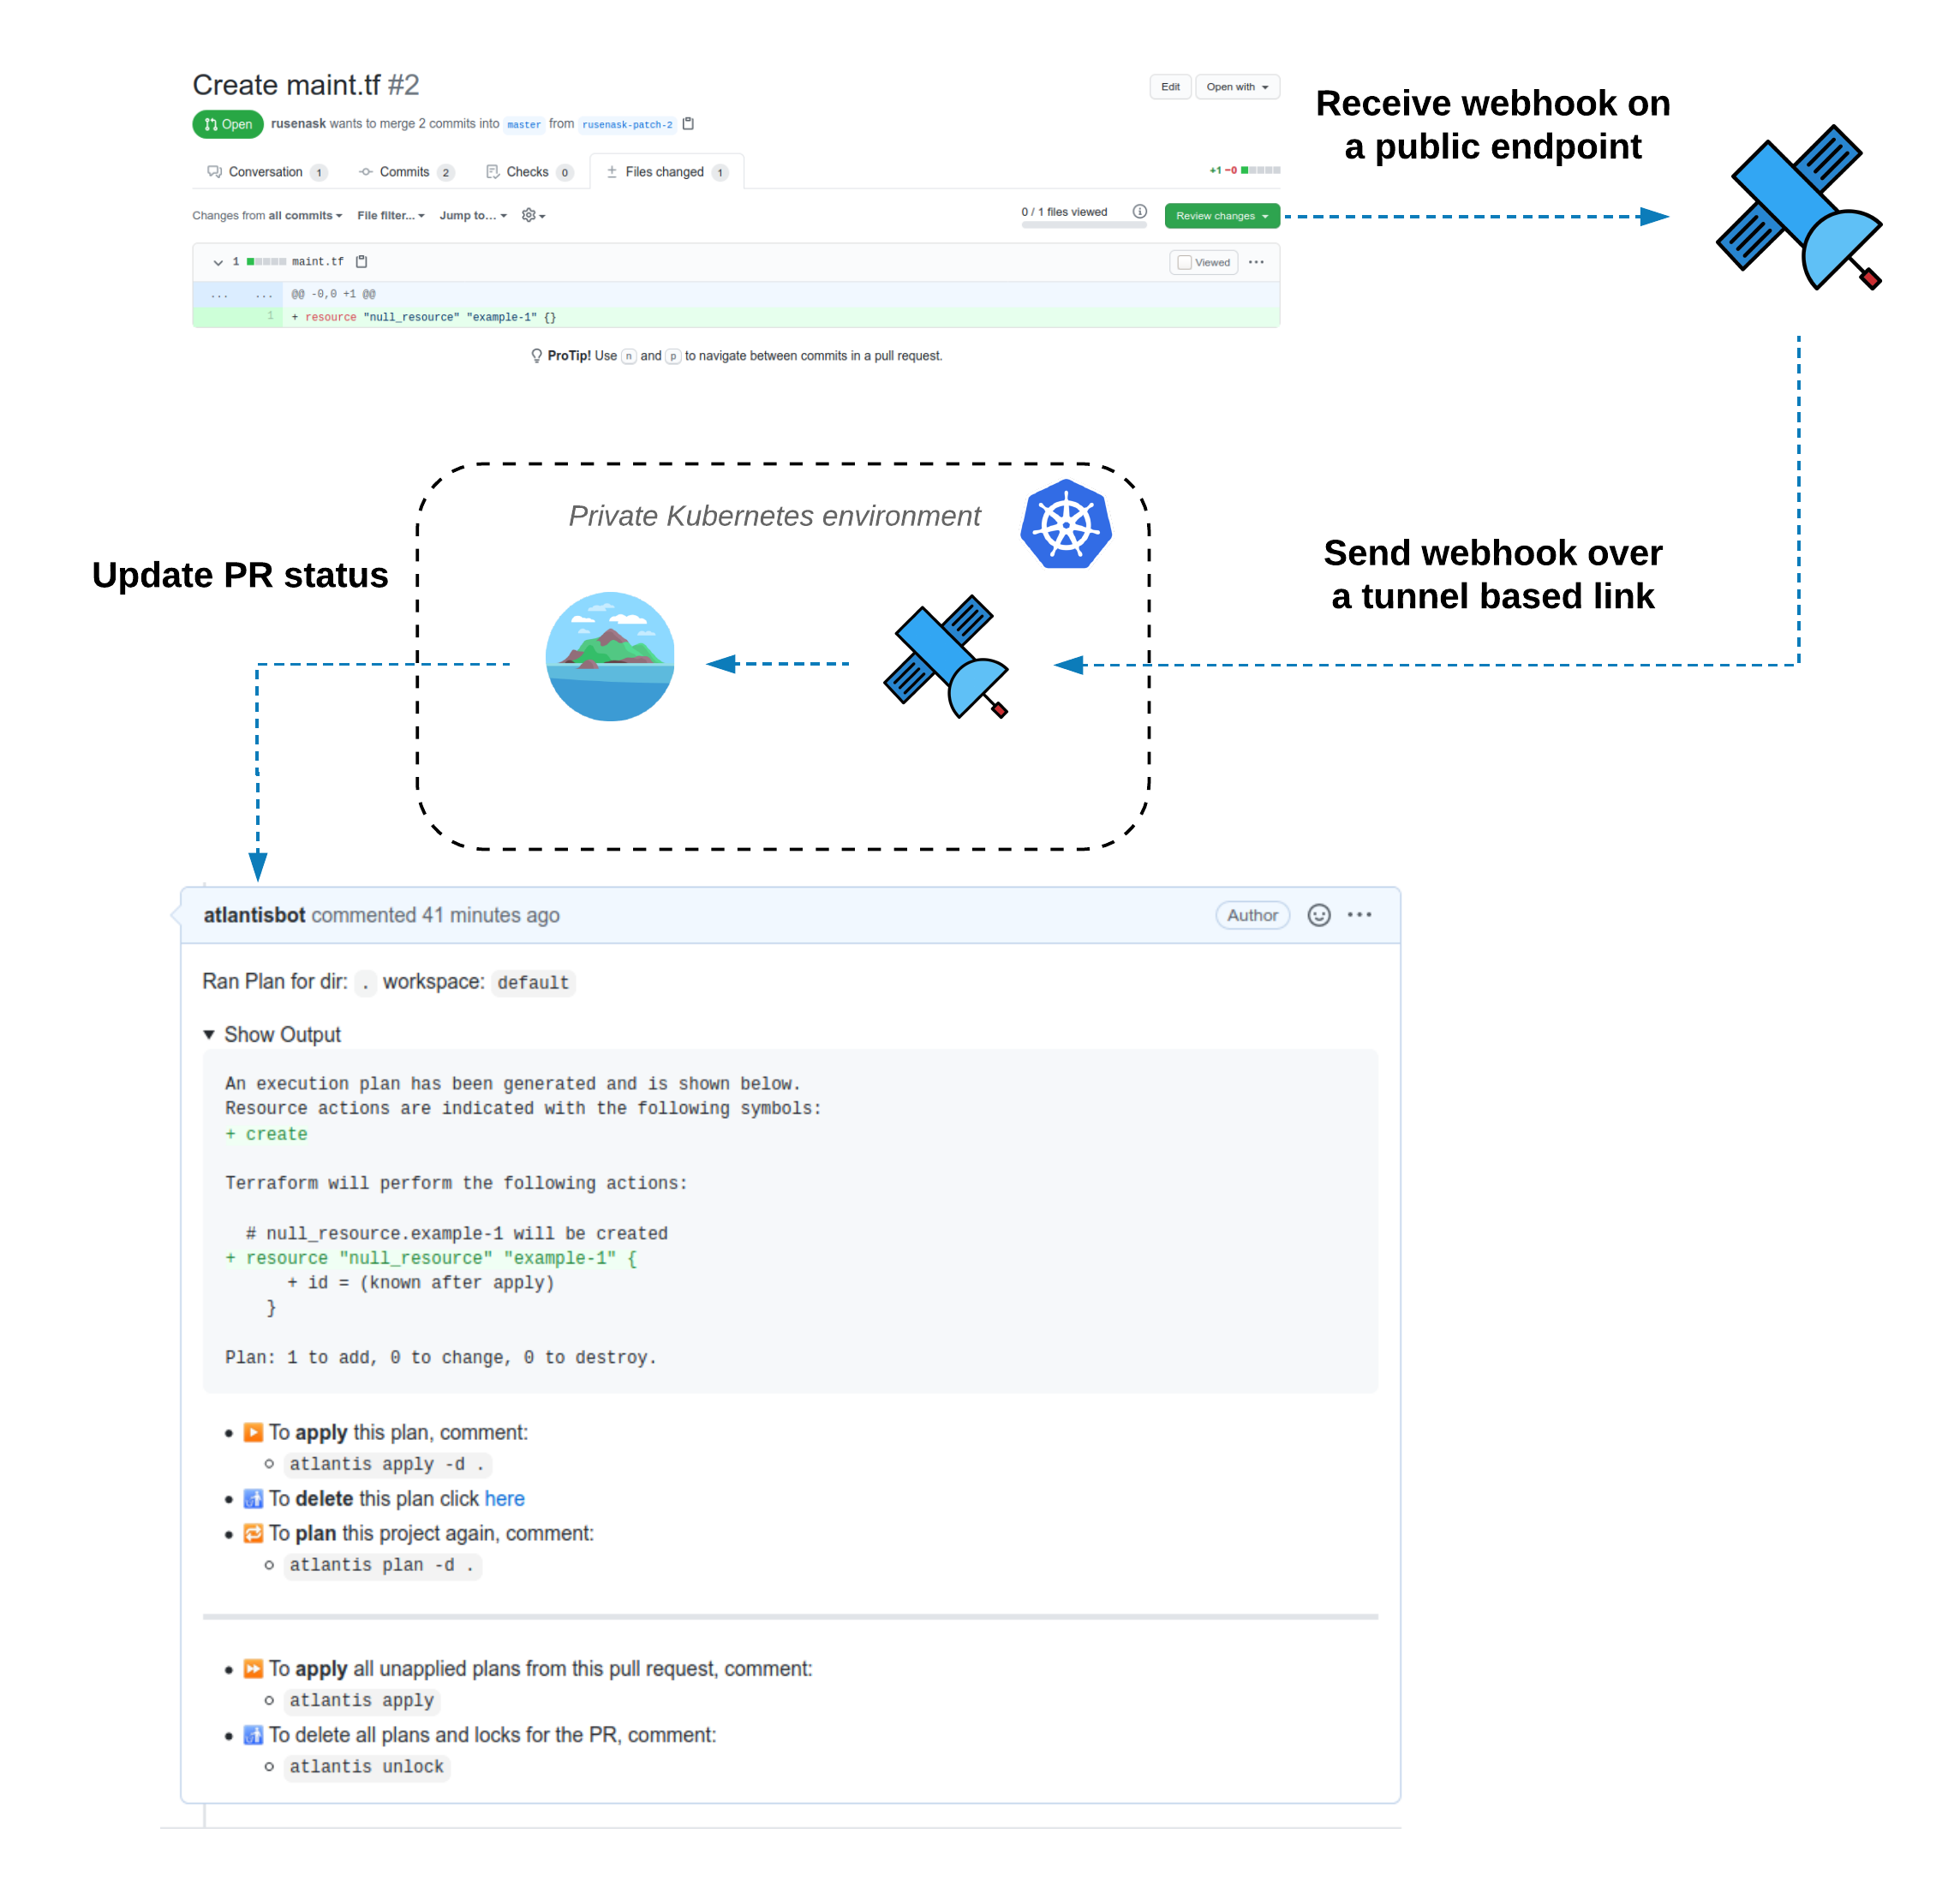
Atlantis is an open source Terraform pull request automation tool. It works by receiving & processing webhooks from various source control management systems such as GitHub, GitLab, Bitbucket, etc. A full list of webhook providers can be found in Atlantis official docs.
In this tutorial, we will deploy Atlantis in a Kubernetes cluster that doesn't have public access.
Note that while we are using Helm to install both Webhook Relay and Atlantis services, this can be achieved with normal Kubernetes manifests.
Prerequisites
- Kubernetes environment and kubectl configured on your machine. For this tutorial, I will be using Minikube on my local machine but the same instructions will work on any other Kubernetes cluster such as GKE or EKS.
- Helm CLI - a Kubernetes package manager.
- Webhook Relay account - webhook forwarding solution to our internal Kubernetes environment.
- GitHub
Git host access credentials
Atlantis will need to communicate with our Git hosting provider. Follow official documentation on getting access token that we can later use in the installation. For GitHub steps are:
- Create a Personal Access Token by following: https://docs.github.com/en/github/authenticating-to-github/creating-a-personal-access-token#creating-a-token
- Create the token with repo scope
Save the access token to your notepad or password manager, we will need it in the next step.
Installation
We will be using the official Atlantis Helm chart that can be found here: https://hub.kubeapps.com/charts/stable/atlantis.
Let's start by creating a namespace:
kubectl create ns atlantis
And let's switch context to it:
kubectl config set-context $(kubectl config current-context) --namespace=atlantis
Atlantis
Add repositories:
helm repo add stable https://kubernetes-charts.storage.googleapis.com
helm repo update
And to install the Atlantis chart (don't forget to set your own details in github.user, github.token and github.secret):
helm upgrade --install atlantis stable/atlantis --version 3.12.2 \
  --set=github.user=rusenask \
  --set=github.token=XXX \
  --set=github.secret=very-secret \
  --set=service.type=ClusterIP \
  --set=ingress.enabled=false \
  --set=orgWhitelist="github.com/webhookrelay/*"
Here, variables are:
- github.user - your GitHub username
- github.token - your GitHub personal access token
- github.secret - shared secret that will have to be shared with Atlantis
- service.type - making sure Atlantis is not exposed as a NodePort service
- ingress.enabled - disabling ingress
- orgWhitelist - which repositories should be processed
To verify your installation, check pods:
kubectl get pods
NAME         READY   STATUS    RESTARTS   AGE
atlantis-0   1/1     Running   0          95s
And services:
kubectl get svc
NAME       TYPE        CLUSTER-IP      EXTERNAL-IP   PORT(S)   AGE
atlantis   ClusterIP   10.99.122.187   <none>        80/TCP    9s
Webhook Relay operator
Once Atlantis is deployed, we will need to create a Webhook Relay operator which will ensure that webhooks will get delivered to our Atlantis pod.
Retrieve your access token key & secret pair from https://my.webhookrelay.com/tokens and set them as an environment variables:
export RELAY_KEY=xxxxxxxxxxxx
export RELAY_SECRET=xxxxx
Add Webhook Relay Operator Helm repository:
helm repo add webhookrelay https://charts.webhookrelay.com
helm repo update
Install it:
helm upgrade --install webhookrelay-operator webhookrelay/webhookrelay-operator \
  --set credentials.key=$RELAY_KEY \
  --set credentials.secret=$RELAY_SECRET
We should see two pods running in our atlantis namespace:
kubectl get pods
NAME                                     READY   STATUS    RESTARTS   AGE
atlantis-0                               1/1     Running   0          6m32s
webhookrelay-operator-65655d7c95-pvtnw   1/1     Running   0          13s
Operator doesn't forward webhooks on its own. Each created CR will ensure an agent deployment that is configured to route specific buckets.
Next step is to configure webhook forwarding to the atlantis service:
apiVersion: forward.webhookrelay.com/v1
kind: WebhookRelayForward
metadata:
  name: forward-to-atlantis
spec:
  buckets:
  - name: github-to-atlantis
    inputs:
    - name: public-endpoint
      description: "Endpoint for GitHub"
      responseBody: "OK"
      responseStatusCode: 200
    outputs:
    - name: atlantis-pod
      destination: http://atlantis:80
Save this file as whr-atlantis-cr.yaml and create it:
kubectl apply -f whr-atlantis-cr.yaml
webhookrelayforward.forward.webhookrelay.com/forward-to-atlantis created
You should see a new pod running in your cluster:
kubectl get pods
NAME                                                 READY   STATUS    RESTARTS   AGE
atlantis-0                                           1/1     Running   0          11m
forward-to-atlantis-whr-deployment-c9bf7fcd7-tz6zq   1/1     Running   0          14s
webhookrelay-operator-65655d7c95-pvtnw               1/1     Running   0          4m43s
Run a kubectl describe on our CRD:
kubectl describe webhookrelayforwards.forward.webhookrelay.com forward-to-atlantis
Name:         forward-to-atlantis
Namespace:    atlantis
Labels:       <none>
Annotations:  API Version:  forward.webhookrelay.com/v1
Kind:         WebhookRelayForward
Metadata:
  Creation Timestamp:  2020-08-11T10:50:26Z
  Generation:          1
  Resource Version:    1582466
  Self Link:           /apis/forward.webhookrelay.com/v1/namespaces/atlantis/webhookrelayforwards/forward-to-atlantis
  UID:                 fbee4016-787d-4b3b-8915-d6c104f4b88c
Spec:
  Buckets:
    Inputs:
      Description:           Endpoint for GitHub
      Name:                  public-endpoint
      Response Body:         OK
      Response Status Code:  200
    Name:                    github-to-atlantis
    Outputs:
      Destination:  http://atlantis:80
      Name:         atlantis-pod
Status:
  Agent Status:  Running
  Public Endpoints:
    https://o0iwkgx6phxnun8wifpxij.hooks.webhookrelay.com
  Ready:           true
  Routing Status:  Configured
Events:            <none>
Here we can see our public webhooks URL "https://o0iwkgx6phxnun8wifpxij.hooks.webhookrelay.com". Find yours and let's add it to the GitHub.
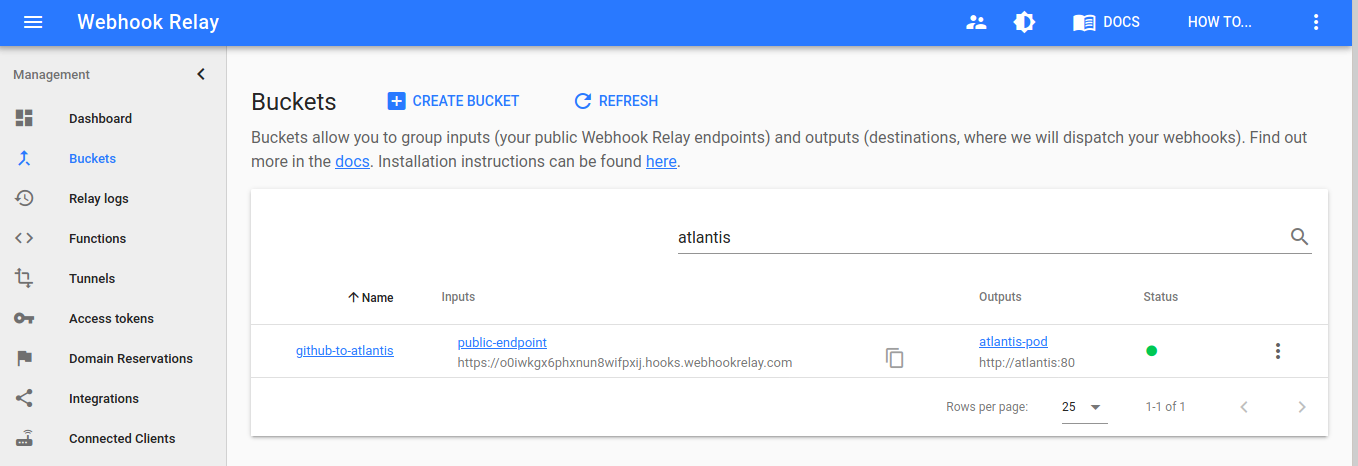
You can also view your bucket configuration and agent connection status through buckets dashboard:

Git host configuration
GitHub configuration instructions can be found here https://www.runatlantis.io/docs/configuring-webhooks.html#github-github-enterprise. However, if you are using any other git hosting provider that Atlantis supports, follow those steps.
Note that my instance endpoint is 'https://o0iwkgx6phxnun8wifpxij.hooks.webhookrelay.com' (yours will be different). Also, custom domains are available if you don't like the generated one.
If you're installing on the organization, navigate to your organization's page, and click Settings. If installing on a single repository, navigate to the repository home page and click Settings.
- Select Webhooks or Hooks in the sidebar
- Click Add webhook
- set Payload URL to
http://$WEBHOOKRELAY_URL/events(orhttps://$WEBHOOKRELAY_URL/eventsif you're using SSL) where$WEBHOOKRELAY_URLis Webhook Relay public URL (in my example it's 'https://o0iwkgx6phxnun8wifpxij.hooks.webhookrelay.com'). Be sure to add /events - double-check you added /events to the end of your URL.
- Set Content type to application/json
- Set Secret to the Webhook Secret you set previously when installing Atlantis helm chart
Note that if you're adding a webhook to multiple repositories, each repository will need to use the same secret.
- Select Let me select individual events
- Check the boxes
- Pull request reviews
- Pushes
- Issue comments
- Pull requests
- Leave Active checked
- Click Add webhook
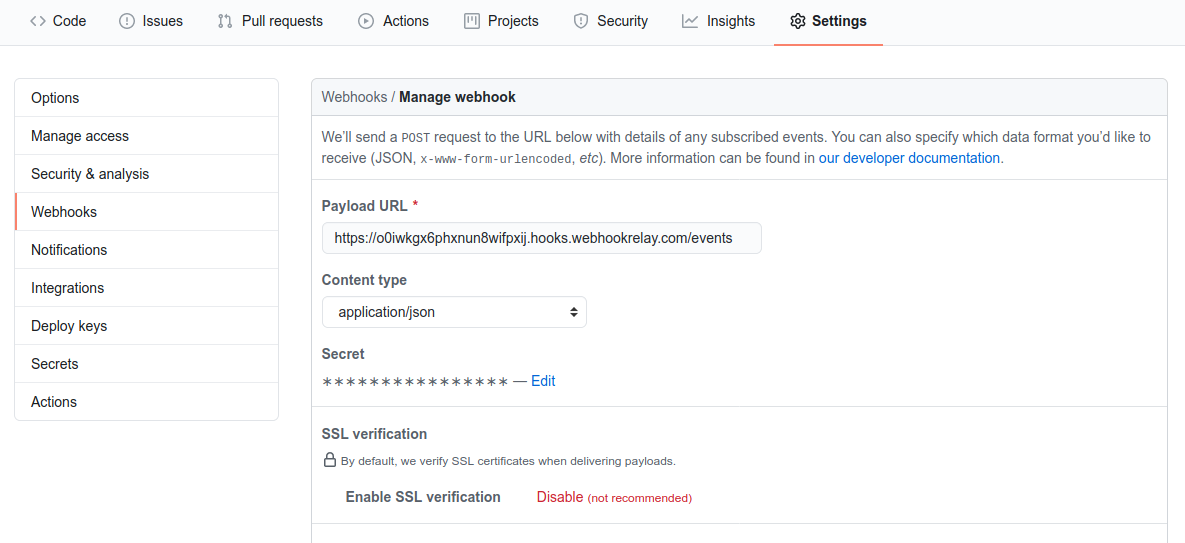
Payload URL and Content Type should look something like this:

Trying it out
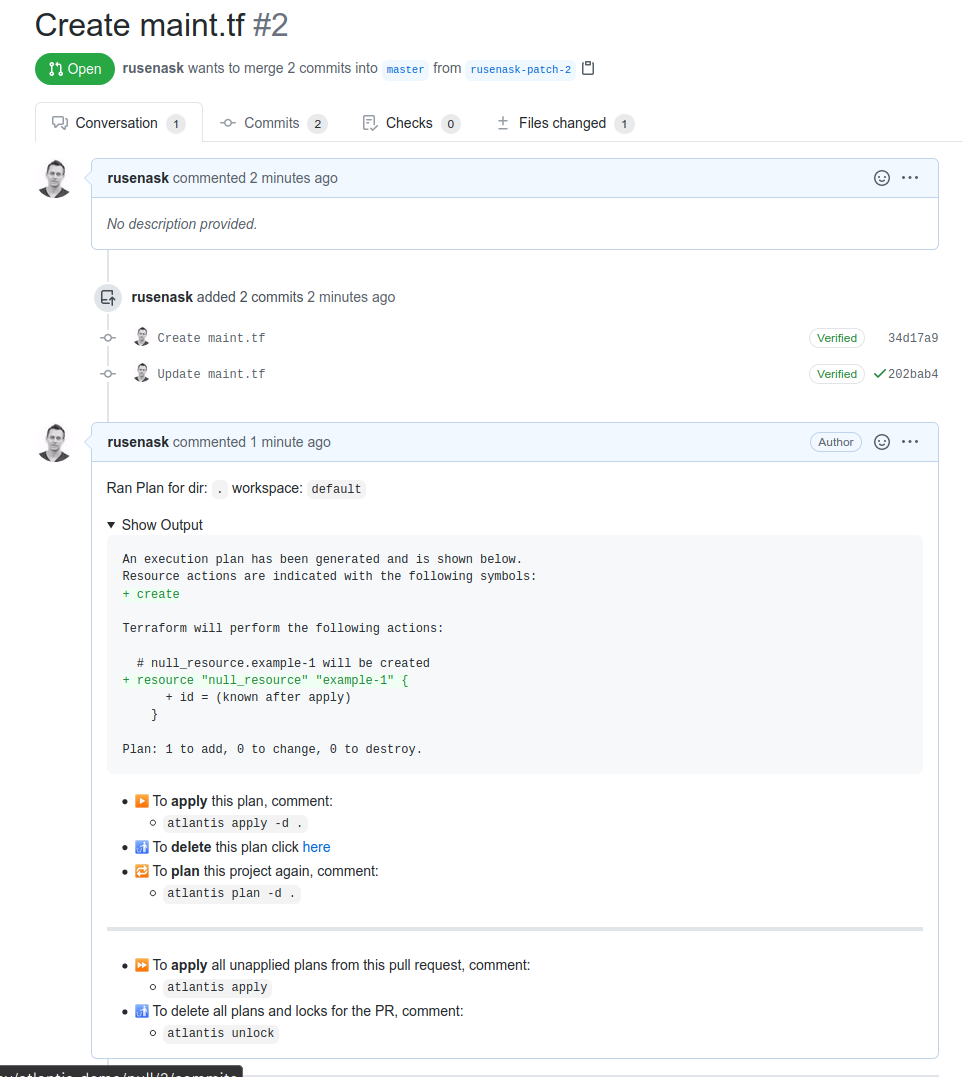
Create a new change in GitHub in a file such as main.tf with a resource resource "null_resource" "example-1" {}. Atlantis will receive an event through Webhook Relay and create a plan:


